Beyond the Garden Basics Podcast
Farmer Fred
Farmer Fred
Picking up where the Garden Basics podcast left off. gardenbasics.substack.com
1d ago
This is a free preview of a paid episode. To hear more, visit gardenbasics.substack.com It seemed like a simple enough garden question to answer. The writer of the email, Steve, said: “I have never cared for a young peach tree or any other variety so I don’t know what to do since I got it in the ground. Now what?” Steve included a picture of the tree, which you can see here. America’s favorite retired college horticulture professor, Debbie Flower, and I ended up having more questions and comments after closely studying the picture. The end result? An episode mostly dedicated to how to plant a fruit tree to insure success. This was originally recorded for the Garden Basics podcast in July of 2020, thus the reference to a hot summer and the muffled sounds of us talking with mandatory masks on. Paid subscribers get full access to all newsletters and podcasts, and we’re having a holiday sale! TRANSCRIPT Q&A: How to Plant and Care for a Young Fruit Tree Farmer Fred Let’s delve into the mailbag, more mail coming into Fred at farmerfred.com here on the garden basics podcast. And we bring in Debbie Flower, retired horticultural professor at many universities and colleges, and she owns a peach tree too. So this is right up her alley. Steve writes in and says, “I have never cared for a young peach tree or any other variety. So I don’t know what to do now that I got it in the ground and mulched. I was given good info and how to put it in the ground. And I believe I was successful. But now what? The tree came in a typical pot with all its roots and dirt, I’m watching online videos, and it’s left me unsure of what to do and when.” Well, Steve was very kind to send along a picture of his new peach tree that he just planted. It’s a little difficult to say how tall the tree is currently, but it looks like…well, let’s just play, ‘what’s wrong with this picture’, Debbie? What’s wrong with Steve’s picture of his peach tree? I see several issues there. Staking Techniques for Young Trees Debbie Flower Well, the first thing that jumps out at me is that the stake is taller than the peach tree. We only want to stake a tree, even a newly planted one, if it is unable to stand up on its own. If it is unable to stand up on its own, then we want to tie it. It’s hard to tell, but it looks like it could be tied at two locations. Not sure if that lower one is really there. Farmer Fred I think that’s a big branch down there. Debbie Flower Okay. Oh, yes. So we only want to tie it as low as we can, to make it stand up straight. He has it tied nearly at the top of the tree. Farmer Fred That’s a very good point you’re making there is that when you’re staking a tree, you want the tie to be at that point where the tree would actually bend. So what you do, you run your hand up the trunk of the tree and at that point where you can get the tree to stand up, that’s where you would tie the top loop. Debbie Flower Exactly, but he can’t tell if it’s going to fall over because if you look right down at the bottom, it is still attached to the nursery stakes. Nursery stakes are used to get that initial upright growth out of the stem, but it prevents the tree stem, fruit tree or otherwise from moving in the wind and from developing strength. And so you need to take it off . I think of it as trees in bondage. When they’re tied this close to the stake, it’s very useful in the nursery, employees can pick up the tree and move it and throw it in a truck and take it out of the truck and the upright part of the tree stays stable, but it is not what we want for the ultimate life of the tree. We want that trunk to strengthen. In order to do that the trunk has to move in the wind just like we have to use our muscles in order for them to strengthen. That trunk has to move in the wind to strengthen, so take it off of that nursery stake and take it off of the very tall stake and see what happens and it is very likely to fall over, not right onto the soil; if it falls over and hits the soil you dig it out and take it back to the nursery. That means there’s a root problem. Somewhere along the length of that tree, that trunk will curve and the top of the trunk of the tree will bend down toward the earth. And that’s when you do what you said, which is run your hand up from the bottom of the tree and at some point the top of the tree will zing back up in the air. That’s the point at which you want to attach the trunk of the peach tree to the stake. Preferably you have two stakes, one on either side of the trunk and you want them a distance from the trunk of the tree, maybe a foot. The reason for that is you don’t want the tree when it is moving in the wind to rub against those stakes and you don’t want them any taller than you need them to be. So the height of the stake would be just maybe five inches above that, about the height of your hand on that trunk. Maybe it’s three inches, just a few inches above, so that you have room to tie. You’re going to tie the trunk to both stakes at about the same location on the tree trunk to each stake, so it looks like one line across from one stake to the tree and back and then from the other stake to the tree and back. It appears when you look at it to be one line across. Does that makes sense? Farmer Fred Yes, it makes perfect sense. And again, he would want if the tree needed to be staking and that goes back to see if the tree can stand up by itself. But if the tree needs staking you would use two and to his credit, Steve did use green tape that’s like tree tie tape, It’s called. And what we don’t know because we can’t see into the foliage of how he’s tied it to the tree. If it’s a figure eight or wrapped, really tightly around the tree, it shouldn’t be wrapped tightly on the tree, it should be sort of a loose figure eight configuration, right? Debbie Flower Right. And that’s part of using two stakes. Because if it’s loose, then the tree may fall toward the stake. If you have one loosely pulling it toward the stake on the other side, then that corrects that problem. Farmer Fred To Steve’s credit, he’s done a lot of things right here we can see that the tree is located in full sun. It looks like he has mulch underneath the tree but the mulch is not touching the trunk of the tree. Pruning New Deciduous Fruit Trees Farmer Fred But I want to go back even further to when he planted the tree. It looks to be a five or six foot tree. Now if he bought this fruit tree, what they call bare root, which would be before it leafed out, and they used to sell fruit trees basically plunked into sawdust and you would go and you’d pull it out of the sawdust and they’d wrap it up a newspaper for you to take it home. Now even though it’s still called bare root, most fruit trees that are sold are come in pots. So we don’t really know if the tree had leafed out before he bought it or if it was still dormant when he did buy it, but the fact of the matter is, when you get a bare root fruit tree home, one of the first things you need to do is basically cut it off at the knee so you get lower branching, this one doesn’t look like it was cut off at the knee. Debbie Flower Correct. Some people may Saturday here that you cut a fruit tree off at the knee. But that is to keep the fruit bearing branches low to the ground so that you don’t have to stand on a ladder to take care of them. It’s a really wonderful way to grow fruit. Farmer Fred Exactly and and you’re not inhibiting the production of fruit at all. You’d still have plenty of fruit is just going to develop some lower scaffolding to make it easier for you to pick fruit. What’s great about starting with a new tree is it makes it Much easier for keeping that tree at a height that’s manageable. So you never have to get on a ladder. And basically, you stick your hand as far in the air as you can. And you don’t let the tree get any taller than that. Debbie Flower Right? The height of the tree is is where your hand and the pruning shears when you raise your hand above your head, the highest it goes. That’s how tall you want the plant to be. Farmer Fred If he’s only planted the tree, could he cut it back in half now? Or should he wait until the dormant season? And can you even cut it back one year into its growth? Debbie Flower Pruning to fruit trees can happen during the growing season Yes, but right now we’re in the maybe thick of summer. It’s hot, Farmer Fred It’s hot. Debbie Flower It’s very sunny. We wear sunscreen and hats and things to protect our skin. If we cut that young tree back now, branches would be exposed to the strong sun that have never seen the strong sun before and they will sunburn, and you could lose the tree from that. So I would recommend waiting until it goes dormant. Farmer Fred Now that is a hard thing to do, if you’ve ever done it, you’ve probably done demonstrations of cutting back bare root fruit trees in front of a crowd and it always gets gasps of horror. Whenever you take your pruners and cut a six foot stick back to a two and a half or three foot stick. Yes. And in Steve’s case, he’s going to be cutting off a lot of growth that had leaves and he’s going to feel really bad doing it. But he should. Debbie Flower He should. And what those leaves are doing for that tree right now is feeding the roots. It’s has no flowers or fruit on it that I can see. And so the the food that’s made in those leaves and that’s where plants make their food goes to a couple of places. One is the tips of those branches for new growth. And the other is the roots and a newly planted plant needs food to make roots. All plants need food to make roots. But it’s especially important when the plant is new to the garden, because it only has the roots that were in whatever container you bought it in. And that’s a very small amount and it’s also a very narrow sized root system and can make the plant unstable if the roots just stay in that little tiny area. So he wants the leaves to grow the leaves to make food send them to the roots, the root system to take off and then during dormancy this year. Now here’s the geek in me. Farmer Fred All right, go ahead. We can geek out. Debbie Flower As plants go dormant, deciduous plants - and a peach tree is deciduous - meaning they lose all of their leaves at one time in the year. And that will be in the fall. The plant will re-absorb all the good stuff it can out of those leaves and store it in the trunks and the roots. And so he’s not losing, he’ll lose some some stored food but a lot of that stored food will be absorbed back into the plant and go down into the roots before he takes that stem off. So it’s important to wait until all the leaves have fallen off, so that all that good food the plant has made, has had a chance to get down into the roots and strengthen the plant down there. Farmer Fred So full dormancy would be when all the leaves have fallen from the tree. But before the soil temperature is warm to the point where it starts breaking out new buds, here in the Central Valley of California that could be in February, other parts of the country might be a little later. Debbie Flower Right. And he doesn’t want to do it before then because it will stimulate growth in strange places and which might cause sunburn. Farmer Fred And maybe frost damage to to the new growth. Debbie Flower Yes, so full dormancy, all the leaves are gone. But before it warms up enough for the buds to break and new growth to begin. Farmer Fred Now remember, too, we’re talking about a tree that is only one year old or less. For people who have put in fruit trees that might be three years, five years old, and you didn’t cut it back by half when it was planted, it’s not a good idea to be cutting a tree that is that old, down to the knees. So what you’d want to do is start a process where you’re cutting it back from the top to get it to a height where you can manage it. Debbie Flower Yes, yes. And you never take more than one third of the canopy, one third to one half of the canopy, out of the tree in any one year. You’re going to take a big branch out and then wait another year and take another big branch out until you’ve brought it down to the level you you want it to be. Pruning Fruit Trees: Thinning Cuts vs. Heading Cuts Farmer Fred Well this is a good opportunity to explain the difference between thinning and heading. So okay, are you talking about making a thinning cut or a heading cut? Debbie Flower Okay, so thinning is removing the branch from its point of origin, the place where it has grown out from a bigger branch, taking it all the way back. And there’s good ways to do that and bad ways to do that. But regardless of whether you do it well or not, it’s called thinning and it results in the natural shape, the plant will regrow into its natural shape. Heading cuts are used on things like hedges, their random cuts in the middle of the branch, or when we prune something into a geometric shape, a square or a circle, and those cuts come middle of the branch and they result in unnatural regrowth of that branch. A lot of buds below where you took the cut open all at once, and you get a very bushy, dense external growth on the plant. If you have done heading cuts to a shrub, go out and look at it. Pull the outside edge apart and you’ll probably see lots of branches in there but no more leaves. You tend to get a very dense foliage on the outer side. There will be lots of leaves on the outside, and no sun goes through to the inside. So when we’re talking about bringing an old tree back to, it’s a shorter shape, and I did this with an apricot in my yard, you want to do thinning cuts, you want to find the origin of that branch and cut it back to where it’s attached to another branch and then remove that. And that will allow other branches that are in my case below that branch and probably in your tree, they’d be below that branch as well, to grow and be strong. And then wait a year and take another one back to its origin. Farmer Fred Well this is an eye opener for me because I always thought that cutting one third of the tree back meant cutting one third of the height back and you’re talking about cutting out one third of the branches. Debbie Flower I choose the branches that are above where I want them to be and cut them back. You can either cut back to their origin or you can cut them back to a place where there is another branch that is one third to one half or more the diameter of the branch to which it is attached. This is hard to do verbally. Farmer Fred Do you want me to put on some tap dance music for you? Debbie Flower Really. So, when we’re cutting the peach tree, the young peach tree back to the knee height, we’re definitely doing a heading cut. Right? Farmer Fred But you’re talking about the old trees, right? Yeah, the older trees when you talk about taking out one third of the growth every year till you get it to the height that you want. Wouldn’t that mostly be heading cuts? Debbie Flower I don’t do it that way. Okay. All right, all right at the top of the plant, find the branch that’s that’s the tallest. I do this with even shorter plants and run my hand down till I find where it’s attached, or where it has a branch of its own. That is, one third to or greater in diameter, then The branch that I’m removing, and I take it at that point. Farmer Fred All right, so that would be a thinning cut. Debbie Flower Yeah, that is considered a thinning cut because the branch that is remaining, even though it’s attached to the branch I’m removing is big enough to take over as the leader. It has the hormonal strength to remain the leader. Farmer Fred You’re a good tap dancer. All right. All right. So that was a scenic bypass about older trees and how you can bring them back to a height where you don’t have to get on a ladder to be picking fruit or netting the tree. After the Paywall: Irrigating young fruit trees; best practices for planting fruit trees; watch out for counterproductive “ancillary sales techniques” at nurseries.
Dec 12
This is a free preview of a paid episode. To hear more, visit gardenbasics.substack.com Holiday Special! For the rest of December 2025, get an annual subscription to the Beyond the Garden Basics newsletter and podcast for 40% off the regular price. Just $30 a year! In this episode, Farmer Fred connects with Don Shor of Redwood Barn Nursery to reflect on the 2025 tomato growing season, sharing their experiences and insights while evaluating the performance of various tomato varieties. Farmer Fred ranks his 2025 tomato season as one of his worst, only second to the scorching summer of 2022, yet he notes that the overall weather conditions this year were quite favorable. Don shares insights from his own experience, noting that several of his trusted varieties, such as Rugby and Bodacious, underperformed this year, likely due to the dry start to the season affecting irrigation practices. They delve into critical topics such as soil moisture levels and root development, emphasizing the importance of watering practices in achieving healthy tomato yields. As the conversation progresses, they discuss the other plants in their gardens, including peppers, onions, edible pumpkin seeds (Pepitas), and cucumbers. Don highlights the successful lemon cucumber, which flourished without issues of mildew, noting the significant yields from this variety. They also explore the common pitfalls of cucumber cultivation and the importance of managing watering strategies to ensure plants remain productive through the growing season. From irrigation practices to soil health and the excitement of trying new varieties, this episode offers an engaging and informative wrap-up of the tomato growing season. Farmer Fred and Don conclude with hopeful notes for the next planting season, reinforcing the lessons learned and anticipating the joys of gardening and fresh produce in the coming year. And as always, a transcript of the podcast is attached for paid subscribers. 2025 Tomato Review Show…and More! TRANSCRIPT Farmer Fred: [0:00] So how was your 2025 tomato year? Well, you get to hear my sob story, and you can hear about all the successes from Don Shor of Redwood Barn Nursery in Davis, California, for the next few minutes. And we’ll talk about other plants as well that did well or didn’t do well in the way of peppers and cucumbers. And who knows which way the conversation will go, but we’ll certainly cover tomatoes. I have to rank the 2025 tomato growing season in my own yard as the second worst ever. Don, you may remember the first worst, which was that summer two or three years ago when in September it got up to, what, 115 degrees? Don Shor: [0:40] Yes, two days at 116, two at 110, and three at 106 over here in the Davis area. That was quite epic in September 2022. We’ll talk about that one for a long time to come. Yeah, it did impact yields late in the season, that’s for sure. ================ CHEF’S CHOICE ORANGE TOMATO Farmer Fred: [0:54] And this year, the weather here in Northern California was excellent. It didn’t get too hot for too long. I’m sure it got over 100, but not by much. And there weren’t extended days of over 100 degrees. It was a very, very nice summer. But I see in my notes here, the first full size tomato I took out of production was on September 27th, the Chef’s Choice Orange Tomato. I harvested 30 ripe tomatoes, but it was the end of production, and I needed the space anyway. But let me tell you about one success, though, and it’s a thing that you told me about to do, and it really works. One of the tomatoes I planted this past year was the Bush Early Girl, that I grew in a container, and I started it (from seed in the greenhouse in early February) and planted it outside on April 6th. And it produced early and often, come June. And by the end of July, it was done for, but it gave me those early tomatoes. And I think that’s a great idea to get an early ripening tomato off to a good start in an area that has warm soil to begin with, like a large container, like a half barrel, and just enjoy your harvest until the big boys come home to roost later on in the summer. But yeah, I’ll give the Bush Early Girl an A for its production. And Chef’s Choice Orange, well, I think that’s going to get an F since it came out in September. Sorry about that. Don Shor: [2:23] It’s not an F. Wait, wait, wait. It gets a C. You took it out after harvesting 30 tomatoes. RUGBY TOMATO Farmer Fred: [2:26] All right. Yeah, I know. Okay, I’ll change that to a C because it did produce some very beautiful Chef’s Choice Orange tomatoes throughout the season. And they were very tasty. And we ended up making some relish with it. So it’s very pretty, too. One of the surprise failures in my yard this year was the Rugby, which up until this year has been doing great. But it went kaput as far as production goes on October the 8th. Don Shor: [2:55] And generally, it’s a good, generally a good late producer for us. I had good results with Rugby, but it was middle of the pack in terms of total yield. Yeah, this was a mediocre year for a lot of people. Obviously, I don’t give everything an F or a C or an A, but there are a lot more lower graded fruit in terms of total yield. BODACIOUS TOMATO Don Shor Bodacious, for example, which I’ve done very well with for several years, only gave me about 15 or 20 fruit. Yes, they’re wonderful. They’re big, they’re firm. They were for slicing. I went out there, there’s three on there right now. We are recording this in early December. So, okay, I’ll brag about that one a little bit. But overall, in terms of the total yield, it wasn’t spectacular. And I think it goes back to actually how dry things were at the start of the season. We had our last significant rain fall on our side of the valley, first week of March. We had another light storm in April. But when people went out to plant, the soil was actually drier than usual. And all of our conversations with people who are having trouble with their tomatoes, not all of them, but let’s say 98% of them had to do with how they were irrigating. I’m reasonably sure that you know how to irrigate. So I don’t think that was your problem necessarily, but a lot of people use a drip irrigation system, they set it, and they leave it that way. And then we get to ask 20 questions with them. How often are you running it? How long are you running it? And they were not watering deeply enough. And in particular, this year, the tomatoes just never got their roots down in some cases. The soil was dry down further. And ordinarily, when you plant in March, well, you shouldn’t be planting in March. But when you plant April or May, there’s still enough moisture from the winter rains down there. And if you give them a good soaking, get them started, they can tap down and tap into some of that stored moisture. It just wasn’t there this year. So we were having a lot of conversations about plants that weren’t growing vigorously. CHARLIE’S MYSTERY RED DELICIOUS CHERRY TOMATO Farmer Fred: [4:44] This is only the second year where I have not had tomatoes on the Thanksgiving dinner table because I ended the production of the Jetstar and the Dr. Wyche, back on October the 29th. The last full size tomato to go out was Cupid. Plants were cut out. But the one that lasted the longest was a gift seed from our friend Charlie in Brooklyn. It was his mystery red delicious cherry tomato that hung on until mid-November. But for us not to have a tomato on the table on Thanksgiving is a defeat. What really broke my heart, too, is that I did harvest some breaking tomatoes, the ones that are turning yellow after being green for a while. So, you know, they’re going to ripen. And I harvested those in early November and I set them way back in the corner in the kitchen counter, hoping to preserve them until Thanksgiving. But somehow they all managed to get used before Thanksgiving. Don Shor: [5:46] Oh, I see. The problem wasn’t that they spoiled. The problem was that your household residents ate them. Farmer Fred: [5:51] Yes. Don Shor: [5:52] Okay, well, that’s a problem to have, yeah. Well, I just went outside earlier, getting ready to have this conversation with you, and there are six in my garden that are still fruiting. Admittedly, the turkeys and the squirrels are helping themselves to the ones down at the end of the garden. MARZINERA TOMATO Don Shor: [6:08] But I’m going to mention one that, boy, I was really impressed with this year, Marzinera. And there’s probably a dozen fruits still on this plant out there. Marzinera is one of the, Heirloom marriage tomatoes, these are where they’re hybridizing two heirloom varieties to get a, well, now it’s a hybrid that hopefully has the characteristics that made each of those heirlooms so desirable. And Marzinera, part of it is San Marzano. Now, San Marzano tomato has its own following, no question. But it’s got some issues. To me, it’s not the most useful tomato. There’s better sauce tomatoes. It’s kind of hollow and skinny and yields well. I mainly stock that one as a retailer just for my old Italian customers. But there’s Marzinera. He’s a bigger fruit, firmer, meaty. It’s a lot more like Roma, but on a plant that is indeterminate and extremely productive. And it was one of my first to produce. My notes through the season show it is good production. And there’s still probably a dozen that the turkeys haven’t gotten at out there that I could harvest right now. So that’s one that I’m watching for next year. I’ve never grown this one before. But these heirloom marriage tomatoes are kind of fascinating me. I did two of them this year. That one in particular did extremely well and is still producing late in the season. Farmer Fred: [7:18] Whenever I think of San Marzano, I immediately think blossom end rot. How did that do? Don Shor: [7:24] Well, that was one of the comments on many of the online resources about Barzinera. I did not have blossom end rot problem with it. I don’t generally get a lot of blossom end rot, and I think that’s partly because I water deeply and relatively infrequently, but nothing ever gets drought stressed in terms of tomato watering on my property. And I did not have that problem, But it has been noted, as I say in the comments, whenever you look this one up on various websites. So I’ve only given it one year. I also have a two-year rule. Am I recommending Marzinera? Not yet, but I’ll definitely be growing it again next year. Farmer Fred: [7:58] I want to point out that the Marzinera, that is a cross between, as you pointed out, the San Marzano and the Cream Sausage tomato, which I’ve also grown in the past and thought it was okay, but it really didn’t stick in my brain for very long. Don Shor: [8:13] San Marzano produces very well for me. I just have never found it as useful as, well, some of these old guys absolutely swear by it. My father loved San Marzano, did very well in coastal San Diego. So it does have a pretty wide range of adaptability. Don Shor: [8:25] But, you know, there’s an interesting book out there called Ten Tomatoes That Changed the World . I don’t know if you’ve seen that one. It came out about five years ago. So he gives a whole history of the San Marzano tomato and the whole region of Italy where it’s almost like French wine. You can only grow it here, and it’s this kind. It was bred for fitting in cans. It was bred to be skinny and for canning and all meat, and that’s what it is. It’s a great cooking tomato. But I get a lot of customers saying, I can’t really do anything else with it. Well, this one is meaty enough and thick enough that you could actually use it for salsa and other purposes. So I don’t know if it’s going to replace San Marzano because those old Italian customers, you know, they know their favorites. But my guess is Marzinera will be one of the heirloom marriage tomatoes that will catch on. GENUWINE TOMATO Don Shor: The other one I grew that’s in that category is Genuwine, and it impressed me early. Good early production. It’s a really good flavor. Now, this is a cross between Brandywine and Castelludo Genovese. So you’ve got two really good flavored tomatoes involved there. But when I see Brandywine as one of the parents, I get nervous because I know that one is not particularly heat tolerant with respect to fruit production. But this one did well early, did okay mid-season, and gave a pretty good crop late. So my guess is for this practice that you’re adopting here and there of planting an early producing one that you’re just going to harvest and process and be done with it, Genuwine might be a good one in that category. Again, first year for it, haven’t tried it a second year, so it’s going to be on my list absolutely to try next year. So those are two of the heirloom marriage tomatoes. Farmer Fred: [9:55] I want to know the ones that you can go out to your yard and pick right now in early December. CHAMPION II TOMATO Don Shor : [10:02] Champion. Champion won again. Once again, it’s a well-named tomato. Now I’m only growing Champion Two. That’s pretty much all I’m getting from my growers. I haven’t grown Champion side by side with Champion two. What the breeders are doing is breeding in better disease resistance on these new improved versions of Early Girl, Celebrity, Champion. So I’m assuming that the growth, yield, and productivity is all pretty much the same and that all I’m gaining is that disease resistance package with the new ones. Champion two got off to a slow start i didn’t even plant it until the end of june, and it was growing along great and set real heavily August, early September and I was picking very well off of that one in October there’s still some nice looking fruit out there and one of the advantages of Champion this is also a little bit of a drawback from the eating standpoint but it’s got a tougher skin and so my experience is even if we get rain, even if we get let’s say a week of very gloomy weather, such as we just experienced here before the broadcast, the fruit will still hang on there. It won’t just spoil right away. So it’s a good one for late production. Champion is a little more tart flavor. It’s one that definitely benefits from a little extended ripening on the counter. If it’s bright red, it may not actually be fully ripe. That’s something I’ve been mentioning to my customers, and they’ve been finding that three or four days on the counter, it actually gets sweeter and softens up a little bit. So Champion is a good one for your Christmastime harvest. Farmer Fred: [11:26] There are more. Don Shor: [11:28] What’s that? Farmer Fred: [11:28] Aren’t there more? I thought you said you had six that have survived until now. JETSTAR TOMATO Don Shor: [11:32] Oh, yes. One that you recommended to me, Jetstar. I have been very impressed with Jetstar and I only grew it for the first time this year. I don’t think it was on my notes from last year. Produced early, stopped mid-summer. I’m used to this with some varieties where it gets hotter and they stop production, but I don’t take them out. I deep watered it and it flushed out some more growth and it gave me some bloom in September and there’s still some fruit on my Jetstar. That’s one that I believe you introduced me to originally a couple of years ago. Where’s that one from? Do you know? Farmer Fred: [12:04] Oh, where did I get that? I’ll look it up (Harris Seeds) while you tell me some more that are going to make me hungry. What else is available in your garden right now? PORK CHOP TOMATO Don Shor: [12:13] All right. This is Wild Boar Farms, Brad Gates’ introductions. And one of his that goes way back to his very first product line, probably 25 years ago, was Pork Chop. Pork Chop is his yellow tomato. It’s, in my opinion, one of the best yellow tomatoes on the market. It does soften quickly, so you need to use it pretty much right away. But Pork Chop, every year I grow it, consistent yield, 40 to 50 fruit, good-sized fruit, and it seems to take the heat reasonably well. I know it’s from a few years back when we had a very hot summer. I noted Pork Chop that yielded well for me. RED FURRY BOAR TOMATO , COSMIC BURST TOMATO Don Shor: One of the Brad Gates Wild Boar Farms tomatoes that really impressed me this year once again is his Red Furry Boar, which is an old one that goes way back to when he first introduced the product line, also did very well for me. But one of his fairly new ones that impressed me and my staff love the flavor once we figured out when they were right is Cosmic Burst. And I don’t know if you’ve grown this one, but it’s one of these really pretty. He really likes fruit that has stripes and different colors. And honestly, the only issue I’ve had with those is figuring out the first time you grow them when they’re actually ripe. A lot of times they turn color and you can’t tell whether that’s really the full final color. This one is a gorgeous fruit. It’s striped. It’s got gold stripes in it. And it’s got a really interesting, rich, tangy flavor. It’s a two to three ounce fruit. So it’s one of those that’s bigger than a cherry but smaller than an Early Girl, consistent production been very good this year and i’m definitely going to grow it again next year and the description he has is great fruity flavor with a less acidic bite. i agree with that it’s sweet it’s rich it’s you can use it early if you want to but it’s going to be a little more harsh with that flavor some people seem to like that when i took them in fully ripe everybody on the staff is really raved about this one comment does decently in cool weather but does well above average in heat. So that’s a good one for the Valley and did very well for me this year. Farmer Fred: [14:09] And is it still producing? Don Shor: [14:11] It is. I have some out there. I’ll be taking them in. Farmer Fred: [14:14] All right. Don Shor: [14:15] Cosmic Burst is one to watch for. Farmer Fred: [14:17] Besides the ones you just mentioned, you mentioned the Jetstar, and that was from Harris Seeds. Don Shor: [14:24] Yeah. Okay. They’re easy to order from. BADA BING TOMATO Farmer Fred: [14:27] I was talking with Diane Blazek from the All-America Selections winners recently and talking about the 2026 AAS winners. And there is a new tomato on the 2026 list that is described as a cocktail tomato. It is called the Bada Bing. The Bada Bing. So it’s a small tomato, about an inch and a half wide and bright red. And they really like the Bada Bing enough to say that it would be a winner across most of the country. Don Shor: [15:05] Yeah, the All-America series, what’s great about those is you know that they’ve been tested in quite a range of areas. Yeah, Bada Bing here it is. 2026 edible vegetable winner. Unprecedented protection against septoria leaf spot, early blight, and late blight. What’s interesting is tomato varieties are now coming with this complete alphabet soup of disease resistance that’s on the label. I find myself having to explain this to people a lot. And a lot of the things that are on there are not a big concern for listeners here in the Valley. We don’t have a lot of problems with late blight or leaf spot diseases. What we typically are concerned about is verticillium, fusarium, and tolerance for nematodes. But there’s extended breeding now for a lot of these blights, and they do happen. You know, if we have a wet spring, we can get late blight or septoria. But this one, yeah, this looks great. I’ll definitely be adding this to my list for this coming year. Bada-bing. Manageable, 40 inches tall. Farmer Fred: [15:54] Yeah, I like that. Don Shor: [15:56] Does that mean it’s determinate? Farmer Fred: [15:58] No, it’s indeterminate. Don Shor: [16:00] Okay. So it’s a dwarf indeterminate. Got it. Farmer Fred: [16:03] Yeah. How often do you see that? Don Shor: [16:06] Well, let’s see. Well, it’s an increasing category, that’s for sure. The dwarf tomatoes, the miniature tomatoes are really an area of breeding and introduction. There’s a whole lot of new ones out there. I’m just beginning to try them because there’s so many to work from. There was a dwarf Brandywine that came on the market and I grew it. And guess what? It gave me one fruit. Farmer Fred: [16:25] Oh, yeah. By the way, what is the difference between a grape tomato and a cocktail tomato? Don Shor: [16:32] Marketing. Farmer Fred: [16:34] Okay, then what cocktails do you put a tomato in? Don Shor: [16:37] I think that’d be a Bloody Mary. That’s the only one I can think of. Farmer Fred: [16:40] Yeah. But anyway, so it’s a small tomato. It’s, like I said, it’s only about an inch and a half wide. Don Shor: [16:46] Yeah, to me, that’s a cherry tomato. But cherry tomato has a connotation. I have learned people expect them to be tart and juicy. And so if it’s not in that category, they’re sometimes disappointed by them. The cherry tomato, the classic red cherry, and the others like basket packs have been around for years and years, all had a particular pretty high acidity to them. And so that’s the expectation with cherry tomatoes. So it may be that these are sweeter. Maybe that’s the difference, a little lower acidity. Maybe, but again, I suspect it’s mostly marketing. I can see I’m going to have a lot of fun explaining what a dwarf indeterminate is if we bring these in and grow them, but we will do so if we possibly can. Good disease resistance, good garden performance, and unique and reliable, they say here. So why not? Let’s give it a try. I do have great respect for the All-America program. And I know that if they’ve gone to the trouble of putting this in there, it probably grows well pretty much anywhere someone is listening. =================== Farmer Fred: Hi, free subscribers to the Beyond the Garden Basics newsletter and podcast. If you want to hear the rest of our chat about tomatoes, as well as peppers, cucumbers, onion, and pumpkins, you need to become a paid subscriber. Don’t forget that paid subscribers also get access to the complete library of newsletter editions, which now number close to 300. And, the full newsletter and podcast features a human-powered transcription of the podcast, which puts those AI generated transcriptions to shame that you’re going to find on some podcast players. Plus, it let’s me know that I’m doing something worthwhile here, that you find of value, even if perhaps it’s only occasionally. The Beyond the Garden Basics podcast comes out twice a week, on Mondays and Fridays. Some are for paid subscribers, some are for everybody. So, thanks for becoming a paid subscriber. Just click on the Subscribe link in the newsletter to keep the good, research-based gardening information coming your way! And when you do, you’ll get the entire podcast and the complete newsletter, including the transcription. And look for the special Holiday offer for free subscribers in the newsletter. For the rest of December 2025, you can get a paid annual subscription to the Beyond the Garden Basics newsletter for 40% off, bring the yearly cost to just $30. Look for that offer in today’s newsletter. Thank you for listening…and reading the Beyond the Garden Basics newsletter and podcast.
Dec 8
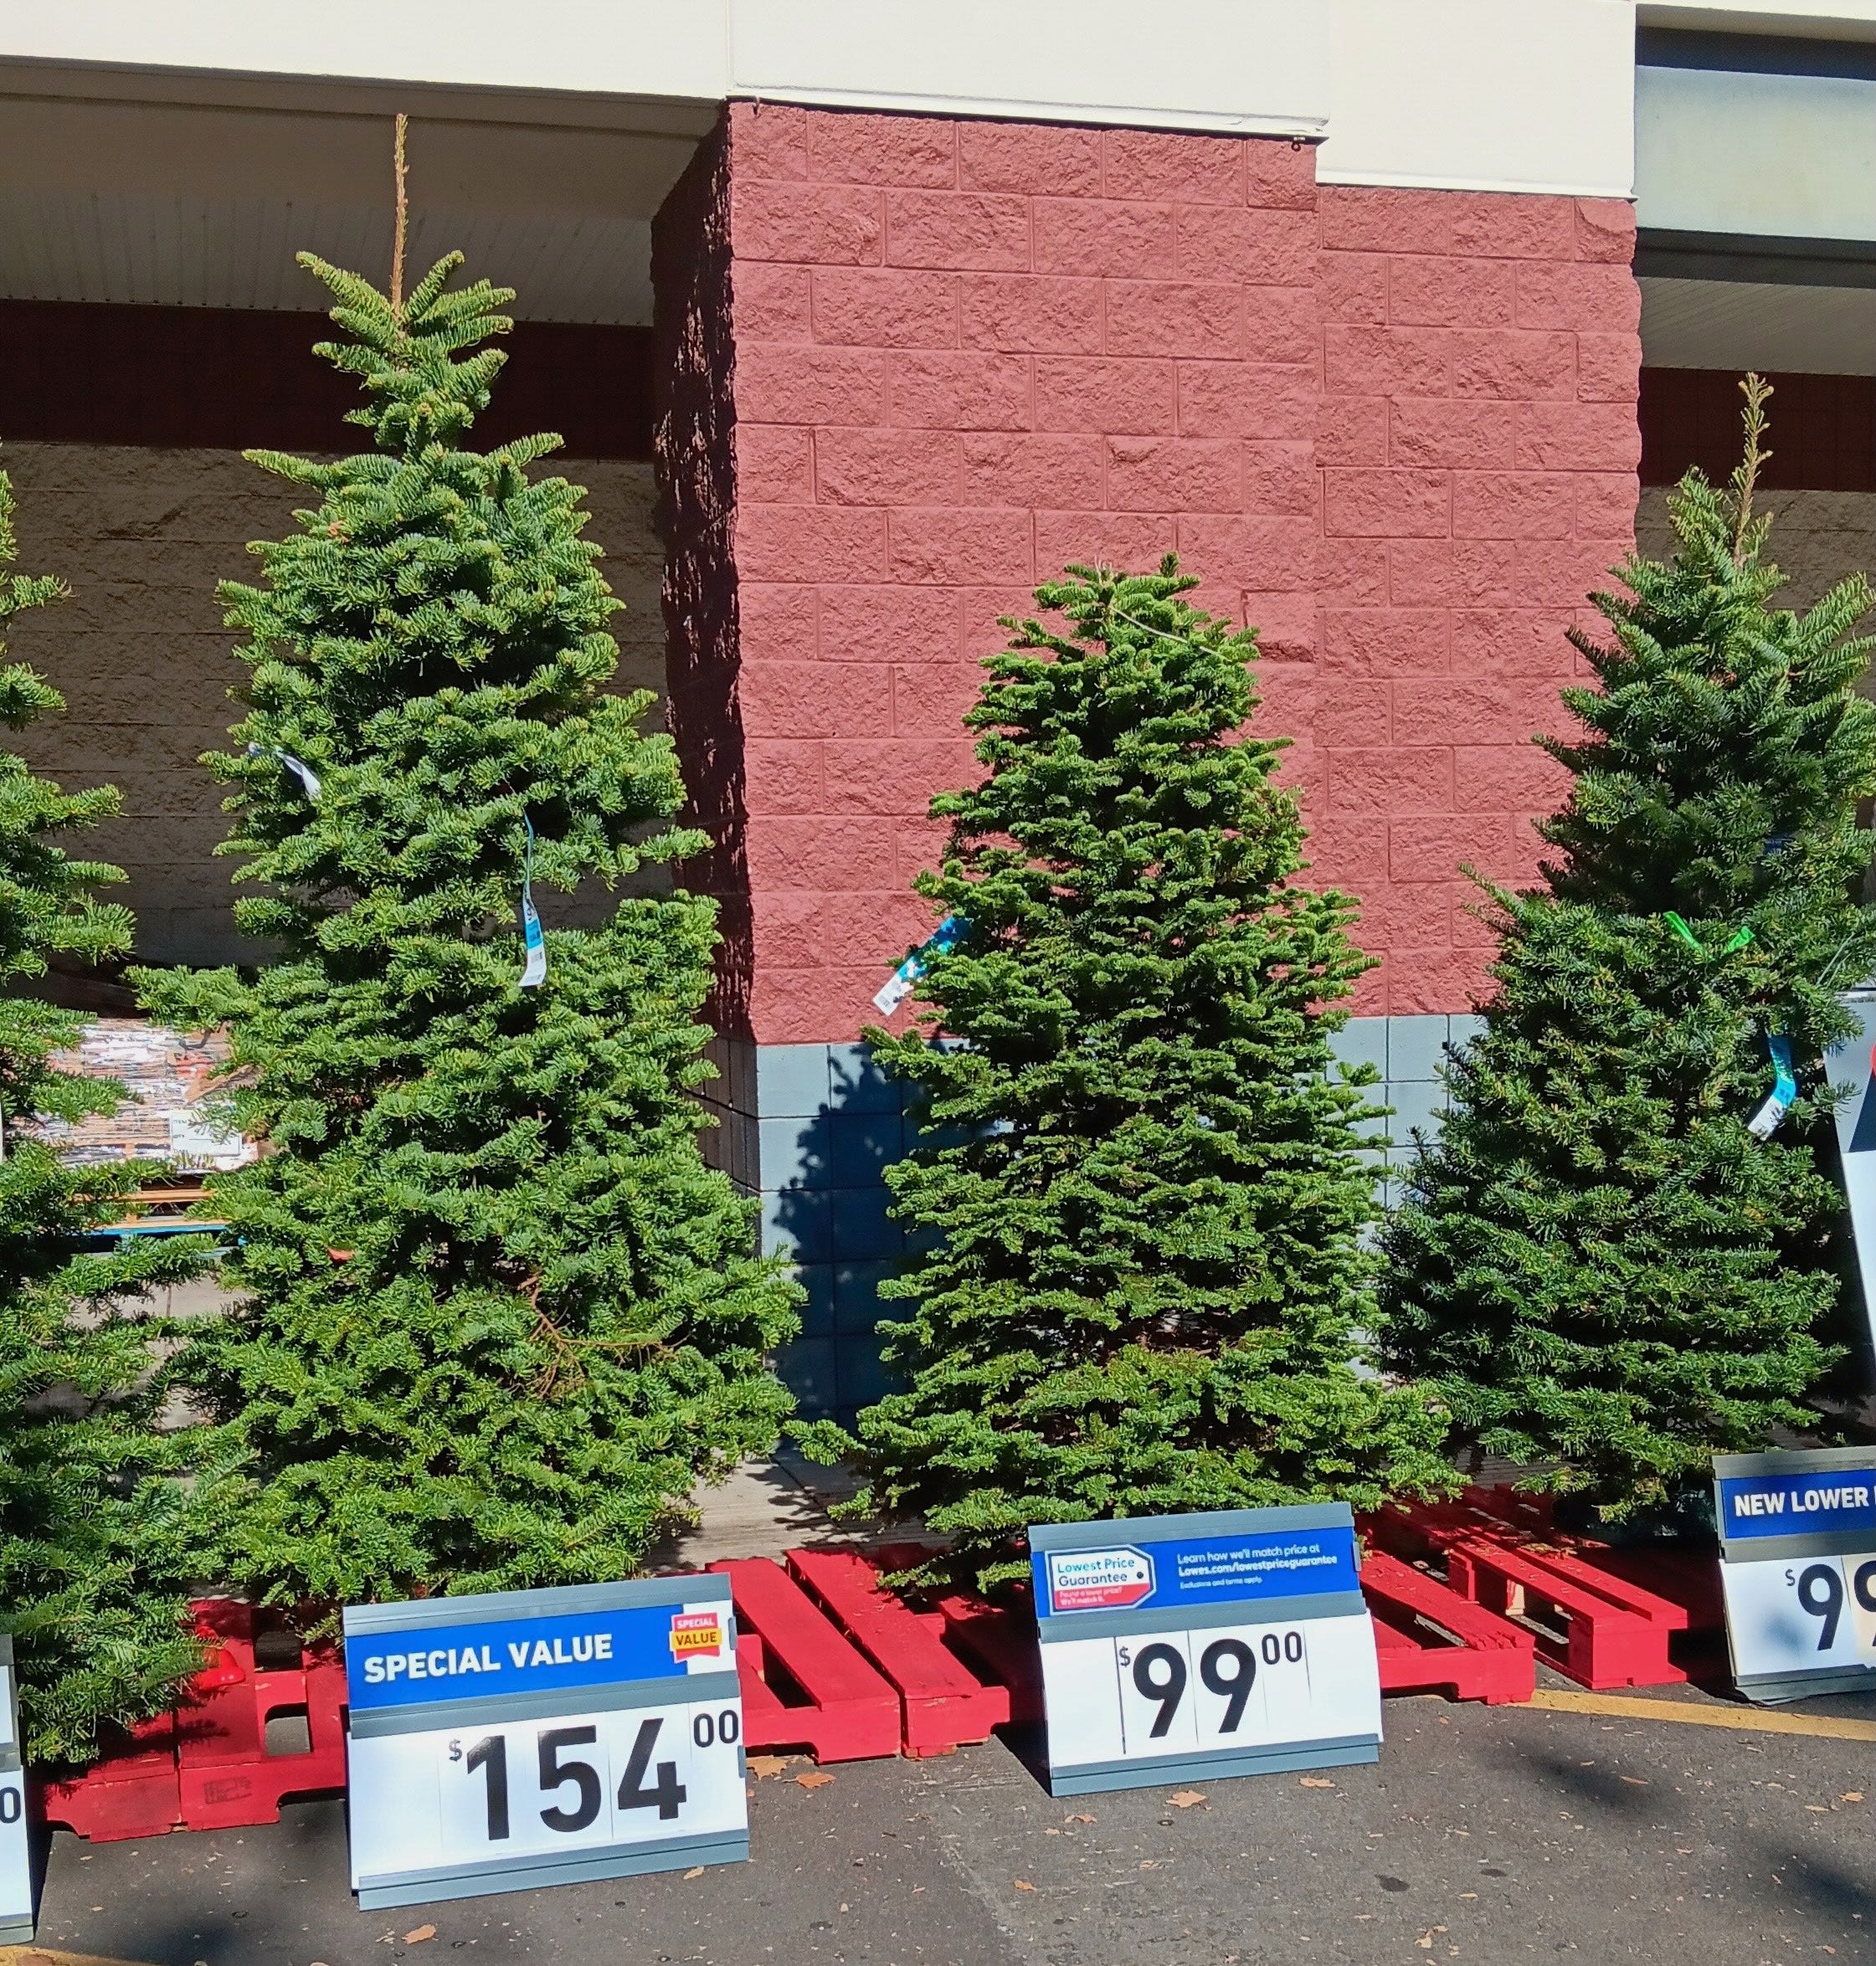
Thanks for reading Beyond The Garden Basics! This post is public so feel free to share it. Visiting a choose-and-cut Christmas tree farm or any of the corner lots or nurseries filled with already chopped cedars, pines and firs this weekend, in search of the perfect holiday tree? Here are some tips from the Michigan State University Cooperative Extension Departments of Horticulture and Forestry to keep your December living room centerpiece intact through the holidays: • You may cringe at this first tip, but it is one of the most important if you plan to keep the tree in the house for longer than two weeks: Keep the tree in a cool, sheltered location until a few days before Christmas, such as an unheated garage or carport. Otherwise, the warm, dry air of your living room or den can hasten needle drop. Storing it in an environment that more resembles a forest as long as possible will keep the branches more pliable. Take off a half inch to an inch from the base of the tree and keep it in a large bucket of water. • Before bringing the tree indoors, shake it vigorously to dislodge any loose needles or hitchhiking bugs. Check for ants, too. • Before you set up your Christmas tree, make a fresh, straight cut across the base of the tree and place the tree in a stand that holds a gallon of water or more. The end should be re-cut each day before it is placed in the stand. Make a straight cut across the trunk, removing a half inch or more from the bottom. • Cut Christmas trees will absorb a surprising amount of water, particularly during the first week. As a rule, for each inch of stem diameter the tree will need a quart of water per day. • Beware of stands that are too small for the tree. Try to find a tree stand with adequate water-holding capacity for your tree, between one and two gallons. The water capacity listed on a stand’s label or box can be misleading. Usually, they list the capacity of the reservoir when the stand is empty, but you also need to allow for water that will be displaced when the tree trunk is put in the stand. • Keep the tree away from dry, blowing heat. Position the tree away from direct sunlight, fireplaces, heaters, and other heat sources to prevent it from drying out. • Use LED lights. LED lights are cooler to the touch and less likely to dry out the needles. • Turn off the lights when you’re not there. Unplug the lights before you leave the house or go to bed. • Check your tree stand daily to make sure the container has enough water. Refill it often to make sure the water does not fall below the level of the trunk bottom. • What about additives to the water to make the Christmas tree last longer? Based on university studies in Washington and North Carolina, plain water is best. Some home concoctions such as bleach and aspirin cause heavy needle loss and should be avoided. Clean water and plenty of it is the only essential ingredient for success. Tips for a Living Christmas Tree If chosen wisely and treated correctly, a living Christmas tree can thrive in your yard for generations. The main thing to remember when choosing a living Christmas tree: pick a variety that will flourish in your area. As with everything to do with gardening, all Christmas conifers are localized. Choose one from a reputable local nursery or home center. They will have the best selections for your area. Usually. Among the conifers available at nurseries that will do well outdoors in most areas of USDA Zone 9 after their indoor holiday use: • Italian Stone Pine . A good choice for the interior valleys of USDA Zone 9. Can take heat and drought when established. Has a moderate rate of growth to 60 feet. • Aleppo, Mondell or Afghan Pine. Also called Pinus eldarica or Pinus halepensis. These evergreens can take sun and wind. As an added bonus for those who own acreage, these pines are good for windbreaks and erosion control. Rapid growers, these pines with gray-green needles can get to 30 to 60 feet tall with a 20 to 30 foot spread. They aren’t that thirsty, either; a deep, twice a month watering is all they require during the summer. • Colorado Blue Spruce. Can take sun, shade and cold, but is susceptible to spider mites. Likes most soils, as long as they’re well-drained. This tree with the bluish needles is a slow grower that will eventually get 60 to 80 feet tall with a 40 to 50 foot spread. • Deodar Cedar. A tree that actually prefers clay soil, as long as there’s no standing water. This evergreen can take sun, wind and heat. It’s a rapid grower that will reach 50-80 feet with a 40-foot spread. Aptly known as, “The California Christmas Tree”. • Incense Cedar. Not a true cedar (Calocedrus decurrens), but this California native tree will truly perform well in many USDA 9 yards. Although a slow grower at first, the incense cedar can get 80 feet tall, with a 15 foot spread at the base. It can take hot summers and poor soil, and doesn’t require a lot of water. It’‘s best characteristic: the wonderful aroma on a hot summer day. • Coast Redwood. Give this tree plenty of room in the yard, if you dare. The coast redwood can get 70 feet tall with a spread at the base of 30 feet. It can take our sun, but to thrive needs frequent, deep watering. Better suited to the cooler areas of USDA Zone 9 where there’s more coastal influence (fog, low clouds). Some tips for caring for a living Christmas tree: • Don’t keep it in the house for more than a week. • Keep it away from heating vents, wood stoves and fireplaces. • Water the tree every day while it’s in the house. A good way to insure a slow, thorough watering is to dump a tray or two of ice cubes into its container. • Decorate it with the smaller, cooler, flashing bulbs. • The tree can remain in a large container for a number of years, but you may need a furniture dolly to move it in and out of the house. • Marginal Living Christmas Trees: Given a little care, the dwarf Alberta Spruce can survive as an outdoor living Christmas tree in USDA Zone 9. Give it afternoon shade for best results. Limber Pines (Pinus flexilis), native to mountainous areas, tend to revert to rounded tops as they age. The exception is the “Vanderwolf Pyramid” variety, which keeps its Christmas tree shape. Another one to be wary of is the Grand Fir (Abies grandis). This tree could soon overwhelm a small yard, reaching heights of 200 feet. Other borderline trees that may have trouble here in USDA Zone 9 include the Tempelhof cypress (Chamaecyparis obtusa) and the Blue Point Juniper (doesn’t like too much water or slow draining soil). At the top of Santa’s horticulturally naughty list is the Monterey Pine, which is better for coastal environments; even in its native environment, Monterey pines are in decline due to pine pitch canker. Here in California’s Central valley, the Monterey pine is susceptible to pests and diseases, and sulks in our summer heat. Another Christmas-tree type plant that is widely available is the Norfolk Island Pine. Known as the Hawaiian Christmas Tree, this is best planted outdoors...in Hawaii. In most of the continental U.S., it makes a good house plant year round. When is a Christmas tree not really a tree? When it is a Rosemary plant, an evergreen shrub that’s been pruned into a pyramidal shape. This herb is a great addition to your outdoor garden for its culinary and bee attracting qualities (blooms in the winter and spring), but would require constant shearing to keep it looking like a Christmas tree...uh, bush. Transcript of today’s Podcast CHRISTMAS TREE CARE TIPS Farmer Fred So are you moving the new Christmas tree around? Or do you have one tied to your car right now, while you’re listening? Are you going to put it indoors? Where are you going to put that Christmas tree? And how do you keep a basically dead tree looking green? It just so happens that in a recent article in the Sacramento Digs Gardening newsletter , Debbie Arrington and Kathy Morrison, came up with some ideas on how to keep your Christmas tree looking green. Debbie Arrington is with us. And Debbie, how do you keep your Christmas tree looking healthy, merry and green? Debbie Arrington Think of your Christmas tree like you would any cut flower: it needs water. And the way to get water is to put it in a sturdy stand that can can hold about a quart of water, at least. The taller the tree, the more water it needs. According to the National Christmas Tree Association, you need one quart of water for every inch of trunk diameter. And so make sure that the stand can hold that much. And then check it every day. Because if the trunk dries out, resin starts forming and it blocks the uptake of more water. And the tree will just dry out like a flower would dry out if the vase ran out of water. Farmer Fred What about additives? Do they do any good? Debbie Arrington Apparently, research that the National Christmas Tree Association shared shows that clean water works best. Home remedies, like adding aspirin or bleach or corn syrup or sugar or a can of 7-Up or whatever didn’t make any difference. And in fact, the corn syrup and other stuff attracted bugs. Farmer Fred If you are driving home from the Christmas tree lot right now, with that tree tied to the roof of your car, one thing you need to do before you bring it in the house is to shake it out and get all the bugs off. But also maybe cut off a half inch or an inch off the bottom of the tree to allow some clean uptake from that water. Debbie Arrington Yes, because that resin can block the flow, the uptake of water. It’s already stopping its flow where that tree was sitting in a lot, waiting for somebody to take it home. The National Christmas Tree Association actually says that you should cut off at least one inch to restore the flow and let the water come back up. Farmer Fred And that water monitoring isn’t just an occasional check. That’s something that you have to check every day to make sure that the basin is full. Debbie Arrington Yes, check it every morning. And you’ll be surprised how much water that tree took up. Farmer Fred And that’s one of my big issues with a lot of Christmas tree stands. They aren’t big enough, so they don’t hold enough water. So I would choose a tree stand that could hold probably a gallon (or more) of water. Debbie Arrington Yeah, if you have a full size six foot tree, you probably do need a stand that will hold a gallon of water. And a gallon sounds like a lot. But if you’re looking at a gallon of milk, that’s how big of a reservoir you need on that stand. Farmer Fred Now you’ve got the tree off the car, you’ve cut off part of the bottom of the trunk, about one inch or so, and you’ve got the stand set up. Where is the best place in the house to put a Christmas tree? What should you avoid? Debbie Arrington The best place to put the tree is someplace that will stay cool and away from direct light. Lots of folks like to put their tree in the front window so everybody can see it. But if that window is facing west or south, it’s going to cook the tree. iI prefers having someplace where it is away from direct light and also away from heat. You don’t want it to be anywhere near a heater vent, because that just sucks the moisture right out of the tree. If the tree is in a nice cool corner, it will retain its needles much longer. Farmer Fred Yeah, that’s the key to keeping the needles on the tree. They haven’t come up with a cure yet on how to keep cats out of Christmas tree ornaments. Debbie Arrington No, that’s why we have a table top tree, and the cat knows that she can’t get up on that table or she’s in a lot of trouble. Farmer Fred And again, I guess the really big point is with the Christmas tree, be it a dead tree or even a living tree, make sure that there is water there. Debbie Arrington Yes. And that’s the thing with living trees. Evergreens don’t like to be indoors. And here you’ve got a big potted spruce or pine, and you’ve love to have it inside at Christmas. But it is not in its natural habitat. And it is desperate for light. Evergreens are all full sun trees. They are not meant to be inside where a tropical plant might live. And so if you do have a living tree, give it as much light as possible, preferably in a sunny window, and make sure it gets watered every day. And then get it outside as soon as possible, because it will be much happier outdoors. But when you return it outdoors, don’t just plunge it into full sun and freezing temperatures, you’ve got to gradually bring it back outside, probably on a covered patio, where it can readjust to outside temperatures and direct sunlight. Farmer Fred And you make a very good point. Here we’re talking about living Christmas trees that you want to perhaps bring back into the house for the following Christmas. You want to choose a tree variety that is going to like your neighborhood. So choose a variety that is adapted to your climate. And there are some interesting little Christmas trees out there, living Christmas trees that are actually Rosemary plants. Debbie Arrington Yes, your Christmas tree doesn’t have to be an evergreen. It can be some other kind of evergreen, that doesn’t lose its leaves. A rosemary plant doesn’t lose its leaves. It doesn’t have to necessarily be a conifer, I guess would be the proper term. You could have lots of different plants be your Christmas tree. I’ve seen Christmas tree that are really rosemary. And I’ve seen different herbal ones, topiary ones, where they they took a privet or some other type of hedging plant and then cut it into the shape of a Christmas tree. You know, Christmas trees are a decoration. And they are a way of bringing some of the life from outside to the inside, and make us merry and bright. You can be creative. You don’t have to necessarily have a fir as your Christmas tree. Farmer Fred Exactly. Just buy yourself a good pair of pruning shears, because if it is the rosemary or some other sort of hedging plant, it will need consistent pruning to maintain that Christmas tree shape. Debbie Arrington Yes. Farmer Fred So, put a pair of good pruners on your Christmas list. Debbie Arrington, Sacramentao Digs Gardening is their publication. It comes out every day. And if people want to check out Sacramento Digs Gardening , we’ll have a link in the show notes to it. But if you want to do an internet search, how do you do it? Debbie Arrington Look up Sacramento Digs Gardening. And we were formerly on blogspot, but we’re now on Cal local. So look for Sacramento Digs gardening dot California dot local dot com. Farmer Fred There you go. Debbie Arrington. Have Yourself a Merry Little Christmas. Debbie Arrington Thank you very much. Happy Holidays! Beyond The Garden Basics is a reader-supported publication. To receive complete, new posts and support my work, consider becoming a paid subscriber. Beyond The Garden Basics is a reader-supported publication. To receive complete new posts, access to all the previous editions of the newsletter, and help support my work, consider becoming a paid subscriber. Thank You. Fred Hoffman is also a University of California Cooperative Extension Master Gardener in Sacramento County. And he likes his bikes. This is a public episode. If you'd like to discuss this with other subscribers or get access to bonus episodes, visit gardenbasics.substack.com/subscribe
Dec 5
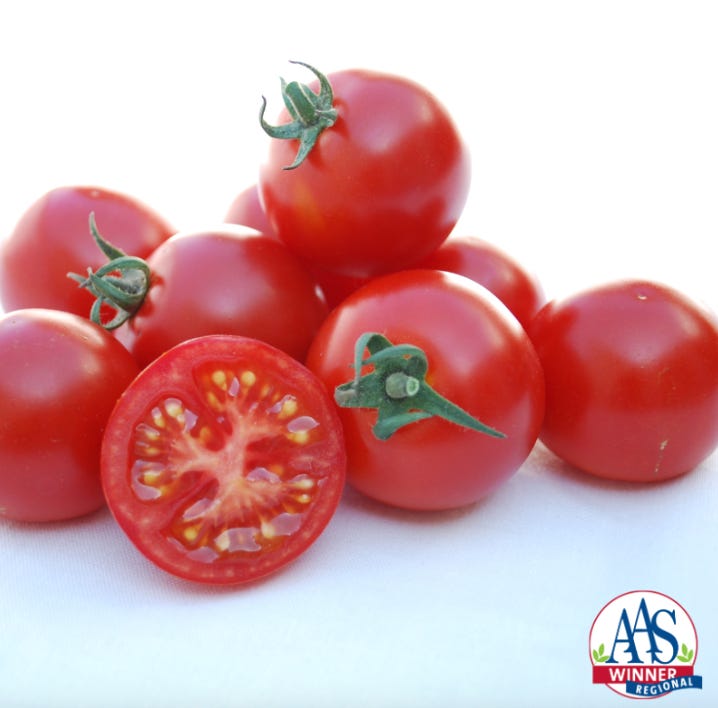
This is a free preview of a paid episode. To hear more, visit gardenbasics.substack.com In this week’s podcast, Diane Blazek, Executive Director of All America Selections (AAS), tells us about the upcoming 2026 gardening season’s latest award-winning plants. We highlight standout varieties like the Bada Bing tomato, Treviso basil, Majesty purple pole bean, and RubyBor kale, each recognized for their adaptability and exceptional qualities. Diane also introduces the Butter Lamp winter squash and Sun Globe coreopsis for ornamental gardens, and shares tips on plant care and spacing. Visit aaswinners.com for a complete list of top varieties and inspiration for your 2026 garden! Beyond The Garden Basics is a reader-supported publication. To receive new posts, get access to the entire newsletter library, listen to complete podcasts, and support my work, consider becoming a paid subscriber. Thank you. For those of us who prefer to read instead of listen, here’s the human-corrected transcript of today’s podcast (with pictures): Farmer Fred: [0:00] So by now, you’re probably looking at gardening catalogs, or scrolling online, trying to figure out what are you going to plant in 2026 among vegetables or flowers. One good place to start is with All America Selections to figure out… what are the winners? What are the good ones? All America Selections is an independent nonprofit organization that tests new, never before sold varieties for the home gardener. There’s a whole season of anonymous trialing that goes on by volunteer horticultural professionals, and only the top garden performers are giving the AAS winner award designation for their superior performance. And all the AAS proceeds go into conducting the trials and promoting AAS winners, both old and new. And there’s a lot of old AAS winners. This is an organization that goes back decades. Here to tell us more is Diane Blazek, the executive director of All America Selections. And golly, it’s getting close to 100 years of AAS winners, Diane. Diane Blazek: [1:05] Yes, it is. We were founded in 1932, so it’s not too much longer. We’ll be celebrating our century. Farmer Fred: [1:13] And it has expanded, I guess, to include a lot of other types of winners, like regional winners and gold medal winners. Diane Blazek: [1:21] Yes. So when the organization was founded, everything was grown from seed and it really was just annuals and edibles. So what we’ve done now is not only expanded from seed, but we also include vegetatively propagated annuals and perennials. And we also now have regional winners, as you mentioned. And what that means is if we get an entry in and it has some very specific regional benefits, when we look at the scores, we notice that it didn’t do well all over North America, but it did well in the Southeast or the Northeast or the Southwest. And that’s how we determine regional winners. Farmer Fred: [2:01] And you also have a category called gold medal winners, but there aren’t too many of those, are there? Diane Blazek: [2:08] No, no. There were way back in the beginnings in the 1930s and 40s, because that was considered, it had to be a breeding breakthrough, like just light years ahead of everything else that was being trialed or the comparisons. So we had quite a few in the beginning, and then we went through a lull. There was about 15 years we didn’t have any gold medal winners. And then just recently, we’ve started to have a few more, and we do have two to talk about today. So I will wait until we introduce those. Yes, there are two in this batch of AAS winners. ======================== BADA BING TOMATO Farmer Fred: [2:44] All right. Well, let’s get started then. Let’s talk about vegetables first. Now, of course, my priority this time of year is looking for interesting tomato varieties to try. I always try a couple of new ones as well as some old proven varieties that usually get repeat performances in my yard. And you do have a tomato in the 2026 vegetable winners list called the Bada Bing. Diane Blazek: [3:13] Yes, the tomato, Bada Bing. So it is a large cherry tomato. So we just put that notation in there in case people look at it and go, well, this is like a cocktail tomato. It’s kind of in between a cherry and a cocktail size. The main thing is it’s disease-resistant, but I don’t want to disregard the taste, the texture, the fact that it’s very, very crack-resistant, nice and juicy like you would expect from a cherry tomato. So we keep calling it the more bang-for-the-buck tomato. Farmer Fred: [3:49] It looks like, because it has an overall height of just 40 inches, with a large container, you could grow the Bada-Bing tomato. Diane Blazek: [3:57] Yes, you could. We did not trial it in containers, but you definitely could. In fact, just this morning, I placed an order for a trade show. I’m going to the summer and we always want to show our new winners. So I went ahead and ordered it in a either a 14 or 16 inch container. So hopefully it will be fine for that size plant. Farmer Fred: [4:19] And I guess if people were saying, well, what tomato variety is it like? I guess it’s pretty close to maybe the Sweet 100. Diane Blazek: [4:27] Exactly. Yeah, that’s one. And then there’s another AAS winner from a couple of years ago called Crockini, and it was compared against those two, the Sweet 100 and the Crockini. All right. Farmer Fred: [4:38] And again, like you pointed out, it has resistance to septoria leaf spot, early blight and late blight. Blight’s a big problem, especially in humid climates. Diane Blazek: [4:49] Exactly. Yeah. And this one did win in the southwest and the southeast, as well as the Great Lakes and Heartland that has a lot of humidity, seeing as how I live there. So we do know that it did perform very well in those regions. Farmer Fred: [5:05] How many days is it to harvest on this one? Diane Blazek: [5:08] That was something else I just went over this morning. From transplant, it would be 65 days. So I’m thinking if you’re sowing straight from seed, probably 80 to 90 days. Farmer Fred: [5:20] Okay. Yeah, usually, the good part about planting tomatoes from seed is they come up fairly quickly, usually within a week to 10 days, unlike pepper seeds. And once they’re up, they start growing fast. So it’s only a few weeks after they’re up and growing that you’d be able to transplant them. Diane Blazek: [5:37] Correct. Yes. Farmer Fred: [5:39] All right. So that again, the Bada Bing tomato. Now it’s not a national winner, but it sure sounds like it would be fairly adaptable across the country. Diane Blazek: [5:49] Exactly. It was four regions. And so, you know, usually when it gets to four regions, it’s very close to being a national winner. So, yeah, this one, you know, I would feel pretty confident in pretty much everywhere. We just know that it did superbly well in those four regions. After the paywall, paid subscribers get more words and pictures about the 2026 All-America Selection plant winners.
Nov 24
Today’s Podcast: Debbie Flower and I tackle the problem of a slow draining lawn. There are lots of strategies for improving a soggy lawn! Where does the water go?” That’s a question I frequently ask myself while bicycling throughout the region, staring at rain-soaked suburban yards. This is also a question homeowners should ask themselves before, during, and after the rainy season. One of the best pieces of advice I can offer any new homeowner: before you spend any time and money on landscaping projects or a garden, live with the existing property for a year. This allows you to take monthly pictures of the area where you want a future garden, perennials, shrubs and trees. When we moved to our new home nine years ago, that’s what we did before we embarked on a totally redesigned landscape. Taking a series of pictures on a regular basis on sunny days, especially at different times of the day (9am, 1pm, 5pm), will remind you how much shade your future plants will be dealing with, and you can plant accordingly. A plant labeled for “full sun” will need at least six hours (preferably eight hours) of direct sun a day. “Part Sun/Part Shade” plants, 4-6 hours of sun per day. “Shade” should be reserved for those plants that get little direct sun (less than four hours) and preferably dappled sun, such as protection from an overhanging deciduous tree. However, the more important reason to live with that new yard for a year before embarking on outdoor landscaping projects: figure out where water goes, both after regular irrigation and after rainstorms. In our case, we discovered that few of the yard sprinklers worked fully or accurately, and that a heavy downpour of rain ends up in the garage. And the basement would flood. As a result, the price of our landscape rehab zoomed upward, to include a complete drip irrigation system for both the front yard and backyard, as well as an underground hard pipe drain system to move roof gutter water away from the house and garage to another part of the yard. Home and Garden Pests That Sing in the Rain The other problem with wet weather: some home and garden pests love it when it’s wet; and others will seek refuge in drier quarters, such as in your home. The authors of the University of California Ag and Natural Resources publication, “Pests in the Urban Landscape,” offer some “Wet Weather Do’s and Don’ts” to ward off problems: • Check for snails and slugs. They like it moist and will sing in the rain. Unfortunately, their singing sounds a lot like, “chomp, chomp, chomp.” These garden leaf and flower munchers don’t like it too wet. They may be easily found headed for dry land – sidewalks and driveways – during a deluge. Find them under loose boards, as well. That’s the time for hand-picking or stomping them. Chemical controls for these mollusk family members are ineffective in the rain. • Remove weeds and unwanted plants. When the ground is wet, pulling them out goes much more quickly. Among the winter weeds spreading here right now are oxalis, nutsedge and groundsel. You may have other cool season weedy invaders in your yard. • Dump standing water. This wet winter is already favoring a big mosquito season ahead. Deprive breeding mosquitoes of water-nesting sites such as flowerpot saucers, wheelbarrows, buckets, clogged storm drains, and roof gutters. • Check for ants, cockroaches, and earwigs. These pests may invite themselves into your home when flooding or heavy rains make the outdoors unappealing to them. Seal any cracks or openings in your home. Outdoors, check the perimeter of your home as well as around doors and windows for insect entryways. Weather stripping, door sweeps, and traps placed beneath eave-protected walkways can help keep them outside. Indoors, keep food tightly sealed and the counters clean, especially near electrical outlets that might provide an entryway. • Remove yard mushrooms. Mild temperatures and wet soil are a combination that mushrooms and other fruiting bodies of fungi love. The good news is they are not harmful to your lawn and garden. The bad news? They can be poisonous to children and pets, when consumed. Rake them up. • Don’t apply outdoor fertilizer or pesticides now. Both are easily susceptible to being washed off the soil or plants and into our waterways. Wait for several days of dry weather before applying any sprays, dusts, liquids, or granules. • Avoid pruning plants unless it is to remove broken or damaged branches. Rainfall and open wounds in the winter on plants is a recipe for spreading diseases. Apricots, cherries, and olives should never be pruned during cool, wet, conditions, advises UCANR. • A common site on sidewalks after a rainstorm are worms, struggling to get out of the wet soil and onto dry land. If you have easy draining soil, you may see their mounds in lawns and gardens as they come up temporarily for air. Those mounds are a great fertilizer: worm castings. Just knock them down with your foot or a rake to feed the soil. • Tread lightly through the garden during or just after a rainstorm. Avoid walking, driving, or moving heavy equipment across wet soil. This compacts the soil, removing necessary air pockets, which are vital for healthy trees, shrubs, and other plants. • One other tip: if you have slow draining areas of your yard after a deluge, mark them. Stick a small stake or object on top of those areas to let you know that the area needs drainage help after the rainy season. Avoid planting in consistently wet areas. Consider putting in a drain system to move that water to another part of the yard to make it more habitable for plant life. Or, consider placing a large container or raised bed in that area for a successful garden. PODCAST TRANSCRIPT - LAWN DRAINAGE TIPS Farmer Fred We like to answer your garden questions. Debbie Flower is here, America’s favorite retired college horticultural professor. Evan writes us from San Jose, which is south of San Francisco, a very mild climate that used to be an area of a lot of fruit orchards, way back when. Now it’s the tech hub with million dollar, two bedroom homes. All right. Go figure. Anyway, Evan writes, “I live in San Jose and in my backyard, I have a very small patch of grass that is around 200 square feet. I want to keep this patch because my daughter practices her gymnastics on it. But in the rainy season, it becomes a swampy bog, so I have to fight the moisture for a few months. During that period, I tend to aerate it with my fork quite a bit. Usually I spend 15 minutes aerating it each week to help it dry out and de-compact it. I usually only disturb the top four to six inches of the soil. But I’m starting to worry that I’m doing too much. Is it possible to aerate the lawn too much? Can you recommend any non-destructive ways to fight moisture and compaction? On a small lawn?” My first comment to Evan is, if you’re using a fork, you’re not aerating the soil. You are compacting it. Debbie Flower Yeah, you’re creating holes, but pushing the soil to the side which is causing compaction on either side of that. And maybe creating more of a drainage issue. I assume he’s having success, or he wouldn’t be doing this over and over and over again. Farmer Fred Well, he says it’s a fork, but doesn’t give details about the fork. Debbie Flower I’m picturing a garden fork. Yeah. And that’s just just tines. Yes, aeration should be done with tubes, hollow tubes that take out a chunk of the soil and whatever roots are in it. And they look if you’ve ever seen goose poop, what they take out of the hole when they’re aerated with a hollow tine aerator looks like goose poop. Farmer Fred Yeah, if you want to aerate, I still like the idea of renting a power aerator because as it picks out those cores of soil, the device also eject them on top of the soil. And you want to be able to do that. I think with a hand aerator, it’s two motions. You punch down, and then when you bring it back up, you have to eject the cores of soil. Debbie Flower It’s a lot of work. Farmer Fred It’s a lot of work and Evan, you’re working too hard. Debbie Flower Right. You use a hollow tine aerator of some sort to aerate the soil. Then you want to collect those goose poops, that are about the size of my pinky finger, perhaps three inches long and maybe a quarter to a half an inch across. Then smash them up so that they’re just loose soil and then rake them in over the top. Or rake in some sand. Something that would hold those holes open and allow air and water to move through them. Farmer Fred And I guess you could do that with a spreader of some sort. I know that in a lot of situations where you’re rehabbing a lawn, and you’re dethatching and aerating, that’s the other thing you might consider, too, is dethatching your lawn. But people who have a rhizomatous... is that a word? Thank you. Rhizomatous or stoloniferous lawn... that can tend to build up a lot of dead material below the surface that you don’t ever see, until you bring in a dethatcher. And all of a sudden you’ve got two cubic yards of dead lawn material to dispose of. And that can help drainage quite a bit as well. Debbie Flower So those typical grasses that would have that problem are bluegrass, Bermuda grass, and creeping red fescue. Farmer Fred Yes, that’s why it’s usually a creeping grass. Exactly. Debbie Flower Yeah, they fill in really well. If you’re a golfer. You would love that because it fills in your divots you make but it’s a harder grass to maintain because of those stems that crawl across the surface and under the surface of the soil. Farmer Fred Fortunately Evan, it’s only 200 square feet. And maybe you can get through what you’re calling the aeration process in 15 minutes a week. But I have a funny feeling you’re just compacting the soil. Debbie Flower Right. My first question after reading his question is what’s causing the flooding? Is the lawn in the lowest part of that landscape so that water is flowing to it? Is it clay soil, so it just takes a longer time to drain? We’re getting more storms that are dropping a lot of rain in a short period of time. And clay soil absorbs water very slowly. So is that the problem? Or is it a perched water table, meaning there are soils with two different types of textures on top of each other, which often happens in new housing developments. That’s because they scrape the land clear, then they build the houses and drive heavy equipment all over the property around the house. And then they bring in, without touching that now compacted soil around the house, they bring in some sort of topsoil mix and throw sod on it. And so you’ve got the sod, which is always grown in a very loose soil, and then whatever they brought in, which is typically a very loose soil, and then this very compacted soil beneath it. That would slow down water penetration. So if you can figure out what’s causing the problem, it’s easier to fix it. Farmer Fred One way to do that would be to take out a fairly sizable core of your existing lawn using a flat headed shovel. And make a little square, maybe eight inches by eight inches by eight inches by eight inches, and go down about eight inches, and then bring up that whole block and see what it looks like. Look at the layers. I wouldn’t be surprised that there is this layer of dead stuff right under the green stuff. And then you’re going to have loose soil, and then you’re going to have the compacted soil, and you want to see how deep do the roots go? And if the roots are just going around the top because, who wants to go into compacted soil? Okay, well, that might be the issue right there, right. Debbie Flower And the damp season is the time to do it. Because the soil would be easier to dig in. It’ll stick together better when you pull it out. So if that’s the case, then you’ve got to create some penetration, some breaks some open spaces between the top of the soil, the stems we’re talking about that you would aerate and dethatch to get rid of, and the soil below. So vertical core aeration might fix that as your fork tines only go about four inches deep. So does vertical core aeration, only go four inches deep. If that doesn’t do the job. If your soil layers are deeper than that, the compacted one that you need to break open is deeper than that, then you’re gonna have to dig holes in places and allow the water to drain there. Farmer Fred Yes, or hardscaping? Yes. Well, there’s that. Debbie Flower One other process that may work but it will take years. Golf apparently was invented in Scotland. I am not a golfer. Maybe your wife knows this. But according to my turf professor at UC Davis, Golf was invented in Scotland and the best golf courses were right on the coast. I guess they’re called the moors. I’m not positive about that. But the reason they were so good is that the soil was quite well drained. And sand would blow up from the beaches below and basically the sand top dressed the lawns every year, with just a little bit of sand, and that is healthy for a lawn to top dress. There are reasons to do it. Usually the reasons are to either apply nutrition in the form of a compost or composted manure, and to fill in holes. If you’ve got a lumpy lawn, and you can fill in holes, you can do it every year, you can do it probably twice a year, but you’re only applying a quarter to a half an inch of top dress. And the top dress soil needs to be very close to the soil the grass is already growing in. The texture of the two need to match. So you may have to buy topsoil. At a topsoil place, you can mix it up to 1/3 to one half with sand, horticultural sand, and just spread a layer of quarter to half inch over the whole lawn. The grass will grow up into it, it will root into it. And so over time, you’re going to raise your lawn, the organic component of what you applied is going to break down, but the sand is going to stay there. So you’re gonna raise your lawn maybe a half an inch a year, and you might raise it right up out of that wet spot. Farmer Fred I have, I believe in the past, written on the Farmer Fred Rant blog page about rehabbing a lawn that included specific instructions on dethatching and aeration, as well as overseeding. And then covering with that top dress material. You can get some good ideas at the soil place on the machinery that makes it a lot easier, like a bigger roller. Actually, you probably want two rollers. If you’re overseeding, you got one that’s filled with water to get the seeds down into the soil, and then a rolling cage with small holes that you fill with compost and roll it across the lawn. And it does a very good job. And I have seen those at rental places. Hey, a good nursery will lend it to you know, for the day. There you go. Yeah, that’s the way to do it. But Evan, yeah, if you’re doing it every week, for 15 minutes, you’re doing it way too much. You throw out a phrase, Debbie of doing it, maybe twice a year. All right. But again, you’re removing cores. Unfortunately, but I’m glad to say we’re getting away from this scenario, of when people have a garden problem. They go into a nursery and say, “What can I buy to fix this?” We were at a nursery yesterday. Yes. And we saw a product that I would might think that a an employee who didn’t know better or was trying to make a sale might say, “Yeah, we got something we can sell you. It’s a natural soil food for lawns and hard soils it it loosens compacted soil that improves root penetration, mass and grass growth and also helps to stimulate microbial life and it’s only 30 bucks.” And, okay, what’s in it? Well, that’s a darn fine question. And we were looking at that bag yesterday. I don’t think we ever decided what was in it. Or were the ingredients even listed in the back. I should check my notes on that. Debbie Flower I think it was sulfur and calcium. Yeah. And iron. Yeah, that’s what it was. It was micronutrients. Yeah, grass needs those, but it’s not going to open your soil. The only kind of soil that this product will have any effect on his sodic soil. That is what it’s called. And it’s soil with salt in it. There are places where salt and I’m talking like table salt, but there are other salts as well. But tablesalt has sodium in it, where sodium naturally collects in the soil and binds it, making it tight. Calcium can be applied to such soils. And it binds where the sodium is, and releases the sodium and opens up the soil. And typically you apply calcium with sulfur because calcium will greatly change the pH or the alkalinity and acidity of your soil. Sulfur will prevent that from happening with this application. So there’s only one very limited situation where this product is going to do anything, other than provide nutrients. Farmer Fred You’d be better off spending your money on a fine compost and rolling that over the lawn. Yes. Debbie Flower And I was saying that this process, the top dressing, can be done twice a year. I wouldn’t dethatch and aerate more than once a year. Okay. You want to do the top dressing when the grass is actively growing. I like to topdress in spring when the forsythia shrubs bloom. That’s typically when the soil is warm enough for the spring weed seeds to germinate. And I like to top dress to cover up those baby seedlings so they can’t find the sun and they don’t grow. Debbie Flower I love horticultural phenology. And that’s what that is. You do garden chores based on what’s in bloom or what’s happening in the garden. And the forsythia bloom usually happens in late winter. Debbie Flower Or early spring when the soil is just getting warm enough for things to germinate. Or you find you’re mowing the lawn more often. Farmer Fred Yes, there’s that too. Again, most lawns, and we don’t know what type of lawn Evan has. So it could be a cool season lawn. It could be a warm season lawn. Yes. Debbie Flower And in San Jose, I would guess would be a cool season lawn. Farmer Fred yeah, but you never know. So, Evan, stay off your lawn. Debbie Flower Yeah, don’t walk on it when it’s really wet. That compacts the soil in and of itself. Farmer Fred Exactly. Now, it should be moist when you do this work, but not so soggy, not too soggy. That would actually compact the soil. Because when you compact the soil, you’re removing air, right? Air is a necessity for root growth. Debbie Flower Yes, it is. Good luck. Farmer Fred There’s a lot I would do in this situation, I think. Perhaps start over. Start over, get some professional equipment. I would first of all, I’d dig out that chunk that eight by eight inch chunk. Debbie Flower You got to know what’s going on down there. Yeah, identify the pest, if you will. If you do that send us a picture. Farmer Fred Yeah, it could be the thatch layer that needs to get removed, if you see a layer of dead stuff below the green stuff before it hits soil. If, on the other hand, when you dig that out and it’s just dripping water, well, then you’ve got a watering issue. That could be the flow from your neighbor’s sprinklers or your own sprinklers. And it just may be as you said, Debbie, just a low lying area. But if it’s supporting a lawn, lawns are amazingly resilient. Debbie Flower They are. That’s why people like them. You only have to know one set of instructions to care for a lawn. Yes. Yeah, I suspect there’s layers of soil in there that are impeding water flow. And if it smells, you really got a problem. Yes, it smells like low tide. Or dead fish. Farmer Fred Yeah, that means your soil is getting way too much water. And so think about where the water is coming from and how much you’re watering. It sounds like maybe you can turn off the sprinklers, if that’s the issue. Debbie Flower Yeah. And maybe your daughter needs a really nice mat or trampoline.. Farmer Fred Yeah, we don’t want to discourage your daughter, Evan, from practicing her gymnastics. But yeah, a mat. That makes sense, a 200 square foot mat. right? Yeah. And you’d save yourself a lot of work, it would be a worthwhile investment, right? Debbie Flower And then, when she’s done, or moved on, you can raise that soil level and have a lawn or whatever you want to grow in that location. Farmer Fred Or, you can leave the mat there and sleep out there at night because your wife kicked you out. So there’s always that. All right, so good luck with improving your lawn drainage there, Evan. Thanks for writing in to the Garden Basics podcast, and thank you, Debbie. Debbie Flower You’re welcome, Fred. Beyond The Garden Basics is a reader-supported publication. To receive complete, new posts, have access to past newsletters, and support my work, consider becoming a paid subscriber. Thank You. Thanks for Subscribing and Spreading the Word About the Beyond the Basics: The Garden Basics with Farmer Fred newsletter, I appreciate your support. Fred Hoffman is also a University of California Cooperative Extension Master Gardener in Sacramento County. And he likes his bikes. This is a public episode. If you'd like to discuss this with other subscribers or get access to bonus episodes, visit gardenbasics.substack.com/subscribe
Nov 21
This is a free preview of a paid episode. To hear more, visit gardenbasics.substack.com In today’s newsletter podcast, we chat with Renee Shepherd of Renee’s Garden seed company about the worldwide journey of garden seeds, rising seed prices, and seed availability for 2026. We explore factors influencing market changes, including tariffs and supply chain issues. The discussion highlights the logistics of seed packaging and the importance of quality standards. She also differentiate between hybrids, heirlooms, and open-pollinated varieties, along with the complexities of seed saving. As we wrap up, Renee ends on an uplifting note, celebrating the joy of gardening and encouraging listeners to explore the diverse seeds available while enjoying their growing experiences. 2026 Seed Prices Go Up The good news: the 2026 seed catalogs are beginning to arrive! The bad news: you’ll be paying more for garden seeds. Just as the Halloween decorations are packed away at stores on the morning of November 1, the Christmas lights, trees, and wreaths start jamming the aisles. Don’t fret about Thanksgiving, though: there are usually a few shelves dedicated to inflatable front yard turkeys, and an end cap with flour, sugar, pumpkin pie filling, and canned cranberries to honor the Thanksgiving cook. And it seems that garden seed catalogs are arriving sooner than ever, with the first one hitting our mailbox this year in the second week of November. As you’re ogling the colorful, new hybrid seed and plant introductions for 2026 in those catalogs, your hair might turn a bit gray(er) when you glance at the prices for mail order seed packets (plus shipping). Yep, they’re up. So are the prices of the 2026 seed packets on racks at your local nursery and home centers. The discerning gardener will also note that those 2026 packets, although physically the same size as in years past, may contain fewer seeds. That discerning gardener may also need to brush up on their eighth grade math. Those seed packets can be measured in a number of ways, including ounces (rare these days), grams (getting fewer), milligrams (more common), and the most mind-bending of all, fractions of an ounce (1/64th of ounce! really?). Unfortunately, fewer seed varieties are sold by the actual number of seeds in the packet. And, for a good reason: not all seeds of one variety are necessarily the same size or weight. Still, for the backyard gardener, knowing the number of seeds you’re working with seems like a more common sense approach. So, let’s update our garden math book for when you’re comparison shopping: 1 ounce = 28 grams 1 gram = 1000 milligrams (mg) 1/64th of an ounce = 443 mg 1/16th of an ounce = 1.7 grams How much are prices going up? In the 2024 edition of one garden catalog company, the price for 1/64th of an ounce of Shishito pepper seeds sold for $5.55. In the 2026 catalog, that price - for the same weight - jumped to $6.55, an 18% jump. A flower example: “Golden Yellow” zinnia, in 2024, was $3.75 for 1/32nd of an ounce (that’s 886 mg, for those of you at home keeping score). In 2026, that same zinnia variety is selling for $4.15 for 1/32 of an ounce, about a 10% increase in price. Why, you ask? The cost of everything is up. Add to that, tariffs. Add to that, shipping charges. Who among us have purchased a seed packet of a coveted vegetable or flower variety, and ended up paying more than the packet price in shipping and handling charges? ✋✋✋ An understanding of the seed market is necessary, and after you read what’s below, you will quickly come to the conclusion: those seeds you’re taking out of the packet could have originated from any number of countries. One seed company executive, Andrea Tursini, the CEO of High Mowing Organic Seeds , explained the price jump in the 2026 edition of their catalog: “Last spring, when new tariffs were announced by the Trump administration, we shared the confusion and frustration of many consumers and small businesses. We also promised you transparency as we figured out what this meant for our independent seed company. This past summer, we began seeing the first of those tariff charges rolling in, and as a result, you’ll notice some price increases in our 2026 catalog. First, an important note about the global nature of the organic seed industry. At High Mowing, we’ve scoured the world in search of partners who share our values and commitment to organics. These relationships - and the seeds that come from them - allow us to continuously update our collection, offering improved varieties that meet the needs of our growers. These global relationships and not easily replaced. A reminder that tariffs are fees that American companies pay when importing goods; they are not paid by the exporting company. For example, when we buy tomato seeds from the Netherlands, we pay a 15% tariff. When we import broccoli seeds from Switzerland, we pay a 39% tariffs. Tariffs can be hard to track, showing up on carrier bills long after receiving the seed. This has required additional time and attention for us as a company. Which brings up back to our pricing. We did our best to minimize the increases, and in most cases passed on only a percentage of the increased costs to you.” Coming up after the paywall break: • The Top 10 countries that export seeds. • A deeper dive on how seeds get from a farmer - anywhere in the world - to you. • A chart that approximates the number of seeds of various vegetables per gram in a seed packet. • A library with an ongoing seed swap program. • A transcript of our podcast chat with Renee Shepherd, including which seed companies to avoid online; the decrease in diversity of varieties of flowers and vegetables; two ways to preserve your own seeds, for the short term and the long term; and, three mistakes that beginning gardeners make that can be avoided.
Nov 17
Today’s Podcast We interview climate scientist Daniel Swain, who, besides being a University of California Ag and Natural Resources employee at the California Institute for Water Resources, is well known on social media. Swain runs the Weather West website as well as his frequent presentations talking about extreme weather conditions in California and the west on YouTube , Bluesky , and other social media outlets. TIPS FOR SETTING UP A HOME WEATHER STATION One common topic when two gardeners meet: the weather. Gardeners are usually grousing about some aspect of whatever is happening with the current weather: the heat vs. their tomatoes; the threat of frost to their citrus or succulent plants; gusty springtime northerly winds drying out the soil prematurely; and let’s not forget comparing plant damage due to a freak hailstorm. Many gardeners are amateur meteorologists, with a yard full of devices that measure the air temperature, the rainfall, the humidity, the wind, and more. According to University of California Ag and Natural Resources climate scientist Daniel Swain, more care is needed as to where you place those weather sensors. After all, that thermometer that’s hanging outside your kitchen window may be reading much warmer than what is happening in your garden. “There are genuine microclimates that can vary over that distance. If the thermometer is attached to your house, it might be warmer,” says Swain, who runs the informative Weather West YouTube page and on other social media outlets. “Presumably if it’s a cold night, you have the heater on inside. Some of that’s going to bleed outside a little bit near your house. If you have it hanging on a wall or an eave somewhere, it is going to exert perhaps a bit of a warming effect. And irrigation can affect the reading. Most people who are farmers or gardeners know that once you put water in the soil, once you put water on the plants, you kind of dampen the range of temperatures that you’re going to experience. By having moisture in some places more than others, you’re also going to actively, in some cases, create a temperature differential that’s different than where you might be measuring at your house or out on the driveway.” Swain says more thought needs to go in to where you place that thermometer sensor for the most accurate readings for the plants of greatest concern. “You’re measuring, technically, the temperature of a small increment of air immediately surrounding that thermometer device,” says Swain. “Imagine two different scenarios, the same parcel of land, the same home, and two thermometers within, five feet of each other. There’s not really a meaningful meteorological difference between the temperature across those five feet under normal circumstances. The numbers should be the same. But imagine that one of those thermometers is just sitting out there in direct sunlight. Maybe you’ve mounted it on a pole above a dirt field or over a concrete or asphalt driveway. That thermometer is going to read some awfully high values in the daytime and potentially some awfully low values in the nighttime. And that’s because you have the sun directly shining on the thermometer, heating the thermometer itself because of the sunlight is landing on the device itself. That thermometer is going to read a very high value. On a hot day, you might even get a value of 120 degrees on that thermometer. But as we define the surface temperature, the temperature at two meter height, so right around the top of my head, since I’m a little over six feet tall, that’s kind of a standard meteorological temperature measurement that’s used not just in science, but also for practical purposes and in agriculture and any number of applied purposes, that temperature is actually supposed to be a shade temperature. What you’re measuring is something different than the number that you’re comparing to everyone else’s numbers. When you go to the National Weather Service website and get a temperature forecast or you look at observations from official weather service certified meteorological stations, the temperatures you’re seeing are taken at the six-foot height in the shade.” Beyond The Garden Basics is a reader-supported publication. Some editions are free, some have a paywall. Your paid subscription helps keep the good gardening information coming your way. Thank You! TRANSCRIPT: Home Weather Station Setup Tips with Daniel Swain Farmer Fred: If you’re a longtime gardener, you just might be a weather nerd. You may want to know what’s happening, especially around your garden area and greenhouse, about many things, such as what’s the high temperature? What’s the low temperature? What about humidity, wind, soil temperature, rainfall, evapotranspiration rate? Plus, there’s chill hours, growing degree days, heat index, UV radiation, and a lot more that can be affecting you and your plants. And your meteorological equipment right now may be as simple as a thermometer hanging outside your kitchen window, which may not be the best idea. We’ll have more about that in a minute. Or it could be as complex as a really nifty weather station that set you back $1,000 or $2,000 that sends a myriad of data to your computer or phone or your in-house monitor. So if you’re considering upgrading your backyard weather equipment, you also need to consider the placement of those various devices in your yard to get more accurate readings about what is really happening in your garden area, especially near your food crops. And you know something else? That upgrade that you’re thinking about with your weather equipment just might be a great move because of the recent cutbacks at the National Weather Service, where personnel and working hours have been slashed, including throughout a very wide swath of California. Today, we’re going to get some answers to those questions from Daniel Swain. If that name sounds familiar, you may know him as the man behind WeatherWest.com. He’s a climate scientist focused on the dynamics and impacts of extreme events, including droughts, floods, storms, and wildfires. Daniel holds joint appointments as a climate scientist within the California Institute for Water Resources, which is part of the University of California Ag and Natural Resources, as well as the Institute of the Environment and Sustainability at UCLA. And he’s a research fellow at the NSF National Center for Atmospheric Research. He’s an alumnus of Davis and Stanford, and he completed postdoctoral work at UCLA. And again, his Weather West blog is excellent reading wherever you might be on social media, especially Twitter, Blue Sky, and YouTube , where he does presentations all the time about upcoming weather events. I’ve been a fan of his for years. Daniel, I’m finally glad to be able to talk to you in person. Welcome to the Garden Basics podcast. Daniel Swain: Yes, thanks for the invitation to be here today. It’s great to be on the show. Farmer Fred: All right. I’d be curious about your own home weather setup. What’s that like? Daniel Swain: [3:30] Ah, yes. I actually am based physically in Boulder, Colorado these days because of that NCAR appointment, despite the primary one with the University of California. So we don’t own a home here. So I’m somewhat limited when I can personally install on this side of the Rocky Mountains. But back in California, back when I was in high school, believe it or not, I installed a weather station on my parents’ home in the North Bay. And that is something that I have maintained over the years on their roof. It’s still there. It still gets maintained. And I’m still trying to use, to the best extent possible, best practices for meteorological station sighting on that one. Farmer Fred: I understand completely. I think when I bought my first large parcel of land, I got myself a Davis Instruments weather station, which was at the time one of the best you could buy. And that let me know a lot of things like wind direction, the high temperature, the low temperature, rainfall amounts, things like that. But it has gotten so much better over the last 20 or 30 years. And the data is much easier to comprehend as well because of either in-house monitors or the data is shot straight to your phone or your computer, it makes it a lot easier. But as they say in the computer world, garbage in, garbage out. So where you put that home station, no matter what kind it is, where you put it in your yard is very important, isn’t it? Daniel Swain: Oh, it’s incredibly important. And this is actually something that I think is not always as obvious for a lot of folks as it might be to some meteorologists, although perhaps not even to all the meteorologists in the world who haven’t worked a lot with actual physical instrumentation. And I think this is because, as you say, exactly where you put these devices and where they are relative to other things that might be in the immediate vicinity can make a huge difference into the numbers of the data you’re actually seeing in front of you. And, as you mentioned, there’s any number of different companies that manufacture weather instrumentation or packages of weather stations. Daniel Swain: For my part, just as was the case with you, the one I installed was indeed, I think it was one of the Davis Vantage Pro stations, sort of the best consumer grade ones that they offered for many years. And it’s still there. It’s still chugging along. It’s been recalibrated a couple times over 20 years at the factory, but it is still the same original hardware from 20 years ago, and it’s still going strong with that careful maintenance. But the bigger issue, I think, is indeed where we put it. And the main reason for this is think about what you’re actually measuring, for example, with something as simple as a thermometer. You’re measuring, technically, the temperature of a small increment of air immediately surrounding that thermometer device, whatever the device is. If it’s an electronic one or an alcohol-based thermometer or a digital one, whatever the particular mechanism is, you’re measuring the immediate environment of that thermometer, right? Daniel Swain: So imagine two different scenarios, the same parcel of land, the same home, two thermometers within, say, five feet of each other. So there’s not really a meaningful meteorological difference between the temperature across those five feet under normal circumstances. So the numbers should be the same. But imagine that one of those thermometers is just sitting out there in direct sunlight. Daniel Swain: You’ve mounted it on a pole above, say, a dirt field or a concrete or asphalt parking lot. That thermometer is going to read some awfully high values in the daytime and potentially some awfully low values in the nighttime. And that’s because, of course, you have the sun when it’s sunny is going to be directly shining on the thermometer, heating the thermometer itself because of the sunlight is actually landing on the device itself. It’s also going to be warmer because you’ve put it in an environment that is itself a bit artificially warmer than it could be. You’ve got your own local heat island effect if you’re near that parking lot or that dirt field because that sun is also heating the ground there more than it would if it were, say, grass or some other surface that weren’t so solar radiation absorptive. So that thermometer is going to read a very high value on a hot day, say, you might even get a value of, 120, 130 degrees on that thermometer. And does that tell you that the ambient air temperature is actually 120, 130 degrees? Well, yes and no, because assuming the thermometer is correct, it is reading correctly the temperature of something in that environment. Daniel Swain: But as we define the surface temperature, for example, whether we’re talking about, the temperature at two meter height, so right around the top of my head, since I’m a little over six feet tall, that’s kind of a standard meteorological temperature measurement that’s used, not just in science, but also for practical purposes and in agriculture and any number of applied purposes. That temperature is actually supposed to be a shade temperature. So the temperature of the air at about six feet off the ground where you don’t have any direct sunlight. So if you’re measuring a temperature, out in your dirt field or near the asphalt parking lot or in direct sun even, even if you’re over grass or something, what you’re measuring is something different than the number that you’re actually comparing to everyone else’s numbers. So when you go to the weather service website and get a temperature forecast or you look at observations from official weather service certified meteorological stations, the temperatures you’re actually seeing are the two meter or the six foot height shade temperature. Daniel Swain: And if you’ve put your thermometer in one of those settings we were just talking about, what you’re measuring is something else entirely. You’re measuring essentially however hot a thermometer gets if you put it in direct sunlight over a very absorptive surface. Likewise, at night, the opposite can happen, where those places get a bit colder than the two-meter temperature, correctly defined, because they tend to radiate a lot of that energy back out to space if it’s a clear sky. And so you’re going to get a colder surface than one that has a little less variability day to night. So you might read a bit too hot or maybe a lot too hot in the daytime and potentially too cold at night. So your range is wider than the actual range of the temperature that we might define officially. And this is just for one specific, simple atmospheric variable, right? We’re just talking about the temperature. Things get even more complicated, and we start talking about things like precipitation or wind, and then things get just really, really complicated. We can dig into the details, but I just wanted to offer just how tricky it can be when we talk even about perhaps the simplest to measure atmospheric variable of temperature. And it’s why, for example, when you look at the temperature on your car thermometer, you know, when you’re out on a hot, sunny day or the bank thermometer, you might see it on the side of the road. Those will read values that might seem kind of patently ridiculous. And the reason is those are often thermometers that are sitting there in the direct sunlight on someone’s rooftop or in the case of your car thermometer, right on the hood of your car. And think about how uncomfortable it would be if you tried to put your hand on the hood of a car on a hot, sunny day in the Central Valley. It’s a lot hotter than the air, I’ll tell you that. Farmer Fred: For gardeners who may have only invested in maybe a remote thermometer that they can read indoors, and those units are widely available even at the big box stores. They sell for $20, $30, $40 or so. A practical application that they’re looking for is, how cold is it under my citrus trees? Do I need to put a frost cloth over them? Do I need to protect them in some way from temperatures? And if all you have is a thermometer, as I use in the example, outside your kitchen window, you’re not getting an accurate temperature of what is happening out where your citrus trees are. So to protect that sensor, that thermometer sensor that is in your yard, would one strategy be to hang it six feet up in a citrus tree? Daniel Swain: Well, I think, the key is it depends on what you’re trying to measure. If you are trying to do, for example, frost or freeze protection, then it really does matter what the temperature is at the level of the plant that you’re trying to protect. And, in the example of a citrus tree, it could be very different. The height of where you’re worried about, frost on the leaves or blossoms or fruit of a tree, as opposed to like a ground crop or even something like vineyards, which are often below head height at their highest point. And you get what’s known as a microclimate, especially in the vertical direction. So I mentioned that going five feet, six feet horizontally probably doesn’t affect things very much most of the time. Daniel Swain: But going five feet vertically actually can make a pretty big difference, particularly at night when you have what’s known as a temperature inversion, when temperatures actually increase with height instead of decreasing as they normally do in the lowest layer of the atmosphere. Sometimes that inversion can be noticeably important even within the first few feet off the surface of the ground. And that can matter if you’re talking about the top of a tomato plant or the top of your grapevines versus the top of a fruit tree or a nut tree or something. Daniel Swain : So you sort of got to measure exactly what you need to know in that case. How high are you actually measuring? Is it under the canopy or is it on the top of the canopy? All of that can matter a lot for something as subtle as making sure you’re not falling below a particular temperature threshold. Might it be good enough if you only need to get within a couple of degrees for your purpose, in any of these locations? That might be fine. But if you really care which side of 32 degrees Fahrenheit that the temperature is at a particular height, you probably got to measure it as close to that height and location as you possibly can because you have these huge variations. In fact, a lot of the frost protection systems that are used in larger scale agricultural settings are really based on the knowledge that you do have these huge variations. Think about when people historically have used things as wild as helicopter downdraft, rotor downwash to sort of mix up the air during freeze events in orchards or fans or windmills that mix the air. Daniel Swain: These aren’t hundreds of thousands of feet tall towers that are doing the mixing. A lot of them are just a few tens of feet tall, and yet mixing the air from 30, 40 feet up to the ground can give you enough of a difference to prevent a freeze in a case where there’s a huge difference between the very cold air right at ground level and the slightly less cold air 10, 20 feet up. So sometimes frost protection is even...Leveraging the fact that these vertical microclimates exist it’s why you see vineyards for example on steep slopes on some of the hills in in any place where you grow wine grapes part of that is because that cold air tends to kind of drain downhill into the the valley below or even the culverts and the rivulets below it doesn’t even need to be a big valley. So even just planting on a slope that’s you know five ten fifteen feet above the lowest point on the land gets you that extra degree or two of insulation. So a long way of saying that you got to measure what you actually want to measure. And if it’s something as sensitive as frost or freeze protection, you got to pinpoint exactly the height and the location where you’re trying to protect against that condition. Farmer Fred: So if I’m a gardener listening to this, it sounds like, well, if I’m really concerned about frost protection for my citrus trees, I’d want to hang that sensor a little bit lower in the tree, maybe only two feet off the ground, but in the shade of the canopy. But at night, that’s not that big of a concern, the shade from the sun. But there sure is a big difference if all you have is a thermometer hanging on the wall of your house outside. And what may be happening 10, 20, 30, 40 feet or more away in your yard where that tree is growing. In my own amateur experimentation with that, I’ve seen as much as a six to an eight degree difference where it’s warmer on that thermometer near the house than it is actually out in the orchard. Daniel Swain: Yeah, absolutely. I mean, I can believe it. Part of that, it’s, as we were talking about, there are genuine microclimates that can vary over that kind of distance. But it’s also because your house, for example, might actually be warmer. Presumably, if it’s a cold night, you have the heater on inside. And so some of that’s going to bleed outside a little bit near your house if you have it hanging on a wall or an eave somewhere. Even a tree, for example, is going to exert perhaps a bit of a warming effect. Because if you have the thermometer under the leaf canopy, for example, that leaf canopy itself is going to be both absorbing and radiating some of its own infrared wavelength energy that is keeping things a little bit warmer than it would be if it were just out in a bare dirt or an asphalt field with nothing above you, going out into the clear, cold winter sky at night with less moisture around too. This is where, whether or not you’ve irrigated. Most people who are farmers or gardeners know that once you put water in the soil, once you put water on the plants, once you irrigate, you kind of dampen the range of temperatures that you’re going to experience. So you have less hot afternoons because more of the sun’s energy is going into evaporating water or water transpiring through the plant’s leaves. But at night, even if you have less transpiration or evaporation, that water is still maintaining some thermal inertia in the tissues of the plant or in the soil because it has retained it from the daytime. And so it takes longer for damp soil, for example, to cool down than dry soil. So by having moisture in some places more than others, you’re also going to actively, in some cases, create a temperature differential that’s different than, you know, where you might be measuring at your house or out on the driveway or something else. Farmer Fred: This is a tip we’ve passed along for years to people who are, who have an orchard or citrus trees or whatever, is basically to test that sensor out in various locations to see where perhaps the coldest temperature might be. What’s nice is there are some inexpensive units that are available that will have multiple sensors that you can hook up to one indoor monitor that can tell you the various temperatures at various points in your yard. And that’s not a bad plan for any gardener before they plant anything is figure out, A, where most of the sun is if you really truly do need full sun, and also where the coldest parts are. So I always advise people, before you plant a garden, live with your house, live with your yard for a year and notice where the sun goes, where the shade goes and where the temperatures go on a month-to-month basis before you do anything. Farmer Fred: I’ve noticed with people who buy, we’ll say, the mid-range weather stations that have temperature, rainfall, and wind, a lot of these units, especially the wind part, is mounted on a rooftop. And I’ve often wondered, well, is that really accurate or not? Daniel Swain: Well, when it comes to wind, you know, the answer is unfortunately often going to be a pretty flat no. It’s not accurate. And there’s a number of reasons for this. One is that, first of all, commercial-grade wind sensors are very finicky. There are different ways you can measure wind. Most familiar is probably the spinning cup anemometer. So all wind gauges are anemometers, by the way. That’s the technical term. But the spinning cup variety, it’s exactly what it sounds like. It’s usually three plastic or metal cups that are sort of rotating along a vertical axis. And the stronger the wind, the faster the cups rotate. They’re sort of like mini ice cream scoops that sort of get caught by the wind and spin faster, the stronger it gets. And that gets converted into a wind speed based on the number of rotations per unit time. The tricky part with these is that they’re highly susceptible to getting dirty or to becoming degraded over time. So anything from spider webs to dust to bird droppings to just good old rust will really affect that kind of sensor. It will really bias its wind speed kind of probably low so you’re estimating winds that are too low relative to real winds and honestly some of the ones, especially the lower to mid-range ones that come straight out of the manufacturers from the warehouse, they already aren’t doing so well. So there is a challenge here where it’s actually pretty difficult to measure wind correctly, even if you’ve sighted the instrumentation correctly, because of the inherent challenges with getting that kind of physical instrument to operate and be fully calibrated correctly. Sometimes at the higher end of the consumer grade, as you get into professional-grade instrumentation, there are other forms of anemometers, of wind gauges, things like sonic anemometers, and those are becoming more common. Those are a little bit more resilient to that particular problem of friction, essentially, with the spinning cups, because there are no moving parts in a sonic anemometer. Essentially, the instrument is actively sending out sound waves between receivers, and it’s measuring the distortion of those sound waves between two relatively nearby points. So there are no moving parts. And if it’s calibrated correctly, that can be a decent option because it’s a little more impervious to things like, you know, you still got to clear the spiderweb off occasionally, but dust isn’t going to affect it as much rust, you know, and there’s no spinning wheel to spinning ball bearing situation that you have to worry about. So that can be, an improved option, although it’s usually more expensive. That’s not what you’re getting on your typical consumer grade station But then there is the problem of sighting. Even the very best professional anemometer is going to be in error if you put it in the wrong place. And the wrong place, as you mentioned, it could be the roof line. Now, a lot of people put anemometers along the roof line because it’s really just the most convenient spot. And I get it. Sometimes you do the best that you can. But the problem with putting it along the roof line is that if you have a gusty wind, for example, and you’re measuring it along the edge of a surface, think about what happens if, you were standing up on the roof on a windy, stormy day, you probably don’t want to stand too close to the edge because you get buffeted by all of these gusts and these eddies, these swirling, turbulent features. Because if you think about it, if the wind is hitting the side of your house, Hopefully it’s not going through your house unless you’re inside of a tornado or something. Instead of going through your house it’s hitting the side of the house and you know the air has mass and it has force and it has to go somewhere so where does it go but it goes up once it hits the side of your house it can’t go down to the ground it can’t go through your house unless you have all the windows open, hopefully not. so it’s going to go up and so now all of a sudden you’ve artificially generated wind in a different direction than the ambient wind. You have upward force of that wind, and as it approaches the edge of your roof, now all of a sudden there’s no barrier anymore, and so it’s going to start to move back in the direction that it wanted to go originally. It’s going to go back horizontally, but now you’re going from an upward wind to a 90-degree change to a horizontal wind again, and that induces rotation or swirls or random turbulent eddies. So what I’m getting at is that if you have an anemometer mounted on the side of your house, whether or not it’s a spinning cup or a sonic anemometer or something else, it’s going to be really measuring all the turbulent eddies that your house produced rather than the ambient wind speed. And so you’re going to be measuring, again, something other than what you actually want to measure. So ideally, what you do if you really want to know what the ambient winds are in a given location is you’d essentially mount your wind gauge, your anemometer, on a stick, on a post somewhere that’s as far from vertical obstacles as you possibly can. So out, ideally, in an open field somewhere, and far enough above the surface that you’re sort of getting away from the surface friction layer. So you want it to be, there’s actually a formula based on the height of the nearby objects or vegetation. You want it to sort of be above that. But in general, you know, we often talk about 2 meter or 10 meter winds. 10 meters is kind of tall. That’s like a 30 plus foot Tower. That is unrealistic for a lot of folks. But ideally, if you can mount it, in an open field or, even in an open lot, there’s less sensitivity than temperature, for example. So it’s a little bit less of a problem if there’s, you know, a paved surface or a dirt surface or water nearby, because you’re not trying to measure the temperature necessarily, you’re trying to measure the wind. And here, what you’re trying to optimize is the radius around the sensor where there’s no tall vertical obstacles that could induce artificial turbulence or either artificially enhance or reduce the ambient wind speed. So here, unlike thermometers where you’re trying to minimize the unwanted solar radiation exposure or the exposure to anomalously damp or heated or artificially cooled areas, here you’re trying to avoid proximity to tall objects that could cause eddies or reduce the speed of that wind. So the challenge is if you have one unit where these sensors are integrated into the same physical object, these can be kind of goals that are in opposition to each other. But ideally, what you might have are sensors that you can physically separate and potentially even put them in different locations, because it might be that optimizing for your most accurate sighting for your wind gauge is different than optimizing for your most accurate sighting for your thermometer, for example. Farmer Fred: And for those gardeners with a nice chunk of land where they can accomplish that, probably their first thing they’ll do is go to Amazon and see what’s available. And there’s a lot of those sonic wind measurement devices available at fairly reasonable prices in the hundreds of dollars, not the thousands of dollars. And that sounds like a much more reliable way to measure the wind other than spinning cups. Daniel Swain: Yeah, it certainly can be. It used to be the case that they were incredibly expensive, as you say, were the very cheapest ones from the thousands. But I think this is another place where technology has the technological curve mass adoption has made them a lot cheaper than they used to be. So they’re still not trivially inexpensive, but they’re also not nearly as financially out of reach as they once were, I think. So if I were, you know, if I were buying a new one right now, I would probably do just that and look for a sonic anemometer because they have, in general, you can imagine fewer moving parts, fewer problems. Farmer Fred: Daniel Swain, thank you so much. Daniel Swain: Thanks again for having me. Thanks for reading Beyond The Garden Basics! This post is public so feel free to share it. Broadcast journalist Fred Hoffman has been talking gardening with the residents of Northern California since 1982 on radio, tv, and podcasts. He is also a University of California Cooperative Extension Master Gardener in Sacramento County. And he has a wet weather bike. This Surly Long Haul Trucker was a gift to myself back in 2012, for surviving quadruple bypass heart surgery. This is a public episode. If you'd like to discuss this with other subscribers or get access to bonus episodes, visit gardenbasics.substack.com/subscribe
Nov 14
This is a free preview of a paid episode. To hear more, visit gardenbasics.substack.com Today’s newsletter podcast features an arborist discussing ways you can spot when your trees may be in danger of falling, especially in a wet, windy winter (recorded as the California drought was ending). Also: Consulting Arborist Michael Santos tells us about online resources for homeowners to get more information about the trees in their yard. More information about what was discussed in the podcast can be found at the University of California Ag and Natural Resources publication, “ Inspect Your Landscape Trees for Hazards ”. How to (Possibly) Thwart Tree Damage Before a Storm During or after a particularly violent fall or winter wind/rain/snow storm, TV news crews usually rush to the most photogenic damage during these rare occasions: downed trees, usually leaning against a house or crushing a car. Without the correct care of the trees on your property, winter storms and trees will not get along. Most susceptible are the trees that keep their leaves year round, including broadleaf evergreens, such as eucalyptus and camphor. Add the conifer family to that list: pines, firs, redwoods and cedars. All that mass of greenery acts as a sail in a heavy wind, bending trees at ridiculous angles. Another cause of winter tree failure is crown rot , which despite its name, refers to the deterioration of the root system near the base of the tree. Combine that with a couple of inches of rain onto already saturated soils, and you have tree roots heaving towards the surface, leading to pictures, such as the one above, popping up on the TV news. If this is the view from your window, the day after a major rain and wind storm is not necessarily the best day for the homeowner to tackle the hazardous task of cleaning up the remnants of trees, shrubs and other plants that took a beating. If wind and rain is still in the forecast, the prevalence of slippery conditions and the chance of more falling debris should limit your cleaning chores to dragging broken branches away from the scene of the crime. It is not a good day to be climbing ladders or scrambling into trees while balancing a chain saw. Leave that to the professionals. Signs of Potential Tree Failure Arborists offer this good piece of advice for those surveying the fallen aftermath of a major storm: Limb failure is largely a product of poor tree maintenance over time. Take care of your trees, or they may take care of themselves in ways you won’t appreciate. According to the University of California publication, “Inspect Your Landscape Trees for Hazards” , a nice day in autumn (or winter, spring or summer, for that matter) is the time to take an inventory of any possible future tree damage before you, your house or your car becomes the next victim of a falling tree or branch. Leaning Trees: Are your trees not as upright as the result of recent heavy winds? Can you see newly upheaved roots or soil around those trees? Then, immediate action is required: call in a professional, certified, bonded and insured arborist to do an onsite inspection and offer a solution (find one near you at treesaregood.org ). Newly leaning trees are an imminent hazard. If you have a tree that has leaned for a number of years, that tree can still be a hazard during wet, windy weather. Taking periodic photographs can help you determine if a greater lean is developing. Multiple Trunked Trees: This co-dominant condition can result in breakage of major tree parts during storms. Usually, these trunks are weakly attached. Inspect the point where the two trunks meet; if you see splitting beginning, call in an arborist. Weakly Attached Branches: Trees with many branches arising from the same point on the trunk are prone to breaking during wind storms. Prune out any split branches. Thin out multiple branches. Hanging or Broken Branches: If you see storm damaged branches hanging from the tree, remove them as soon as possible. This includes removing any completely broken branches that may be resting elsewhere in the tree’s canopy. Cracks in Trunks and Branches: Measure the depth of any cracks with a ruler. If those cracks are more than three inches deep, call in an arborist to determine the best course of action. Dead Branches/Trees: Branches or entire trees that have completely died are very likely to come tumbling down in a storm. Dead branches are most noticeable in the summer when the tree is in full leaf. Cavities and Decay: Large, open pockets where branches meet the trunk, or at the base of the trunk, can mean big trouble. The presence of mushrooms on the bark or on exposed roots may indicate wood decay. Call in an arborist. Beyond The Garden Basics is a reader-supported publication. To receive new posts and support my work, consider becoming a free or paid subscriber. The Arbor Day Foundation website has this guide to proper pruning techniques. Also: Tips for Hiring an Arborist . Beyond the Paywall: • Tree Pruning Advice • The Three-Cut Method for larger branches • Small Trees for Small Yards, Medium-Sized Trees for larger Suburban lots • How to Successfully Plant a Tree • The podcast transcript